Kreator konfiguracji
Depending on your settings you can open Config Builder through a tab at the top of the screen or through hamburger menu.
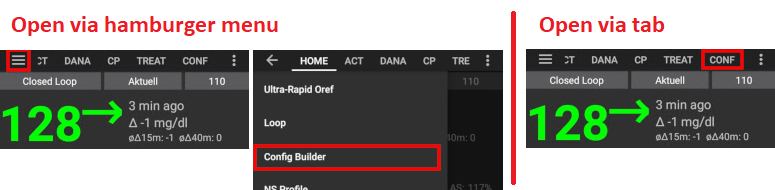
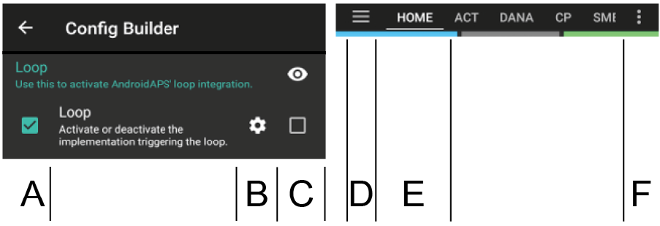
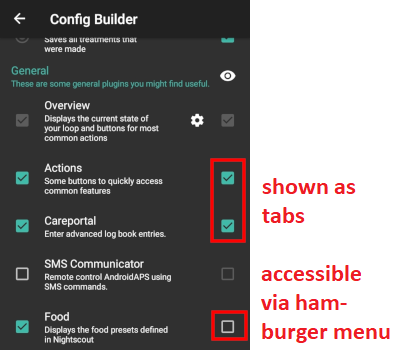
Config Builder (Conf) is the tab where you turn the modular features on and off. The boxes on the left-hand side (A) allow you to select which one to use, the boxes on the right-hand side (C) allow you to view these as a tab (E) in AndroidAPS. In case the right box is not activated you can reach the function by using the hamburger menu (D) on the top left of the screen.
Where there are additional settings available within the module, you can click on the cog wheel (B) which will take you to the specific settings within preferences.
First configuration: Since AAPS 2.0 a Setup wizard guides you through the process of setting up AndroidAPS. Push 3-dots-menu on the upper right-hand side of the screen (F) and select ‘Setup Wizard’ to use it.
Tab or hamburger menu
With the checkbox under the eye symbol you can decide how to open the corresponding program section.
Profil
Select the basal profile you wish to use. See Profiles page for more setup information.
Local profile (recommended)
Local profile uses the basal profile manually entered in phone. As soon as it is selected, a new tab appears in AAPS, where you can change the profile data read out from the pump if necessary. With the next profile switch they are then written to the pump in profile 1. This profile is recommended as it does not rely on internet connectivity.
Advantage:
- no internet connection necessary to change profile settings
- profile changes can be made directly on the phone
Disadvantage:
- only one profile
NS Profile
NS Profile uses the profiles you have saved on your Nightscout site (https://[yournightscoutsiteaddress]/profile). You can use the Profile Switch to change which of those profiles is active, this writes the profile to the pump in case of AndroidAPS failure. This allows you to easily create multiple profiles in Nightscout (i.e.. work, home, sports, holidays, etc.). Shortly after clicking on “Save” they will be transferred to AAPS if your smartphone is online. Even without an Internet connection or without a connection to Nightscout, the Nightscout profiles are available in AAPS once they have been synchronized.
Do a profile switch to activate a profile from Nightscout. Press and hold the current profile in the AAPS homescreen at the top (grey field between the light blue “Open/Closed Loop” field and the dark blue target area field) > Profile switch > Select profile > OK. AAPS also writes the selected profile into the pump after the profile change, so that it is available without AAPS in an emergency and continues to run.
Advantage:
- multiple profiles
- easy to edit via PC or tablet
Disadvantage:
- no local changes to profile settings
- profile cannot be changed directly on the phone
Simple profile
Simple profile with just one time block for DIA, IC, ISF, basal rate and target range (i.e. no basal rate changes during the day). More likely to be used for testing purposes unless you have the same factors over 24 hours. Once “Simple Profile” is selected, a new tab will appear in AAPS where you can enter the profile data.
Insulin
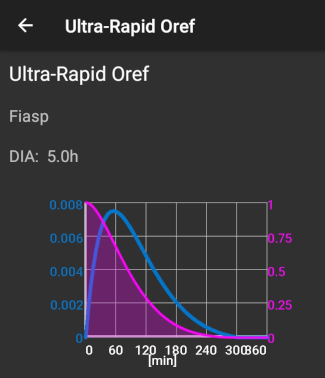
Select the type of insulin curve you are using. The options ‘Rapid-Acting Oref’, Ultra-Rapid Oref’ and ‘Free-Peak Oref’ all have an exponential shape. More information is listed in the OpenAPS docs, the curves will vary based on the DIA and the time to peak.
The DIA is not the same for each person. That’s why you have to test it for yourself. But it must always be at least 5 hours. You can read more about that in the Insulin Profile section of this page.
For Rapid-Acting and Ultra-Rapid, the DIA is the only variable you can adjust by yourself, the time to peak is fixed. Free-Peak allows you to adjust both the DIA and the time to peak, and must only be used by advanced users who know the effects of these settings.
The insulin curve graph helps you to understand the different curves. You can view it by enabling the tickbox to show it as a tab, otherwise it will be in the hamburger menu.
Rapid-Acting Oref
- recommended for Humalog, Novolog and Novorapid
- DIA = at least 5.0h
- Max. peak = 75 minutes after injection (fixed, not adjustable)
Ultra-Rapid Oref
- recommended for FIASP
- DIA = at least 5.0h
- Max. peak = 55 minutes after injection (fixed, not adjustable)
For a lot of people there is practically no noticeable effect of FIASP after 3-4 hours any more, even if 0.0xx units are available as a rule then. This residual amount can still be noticeable during sports, for example. Therefore, AndroidAPS uses minimum 5h as DIA.
Free Peak Oref
With the “Free Peak 0ref” profile you can individually enter the peak time. The DIA is automatically set to 5 hours if it is not specified higher in the profile.
This effect profile is recommended if an unbacked insulin or a mixture of different insulins is used.
BG Source
Select the blood glucose source you are using - see BG Source page for more setup information.
NSClient BG
Glimp - only version 4.15.57 and newer are supported
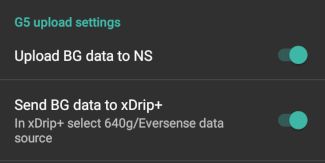
Dexcom App (patched) - Select ‘Send BG data to xDrip+’ if you want to use xDrip+ alarms.
Pump
Select the pump you are using.
- Dana R
- Dana R Korean (for domestic DanaR pump)
- Dana Rv2 (DanaR pump with firmware upgrade)
- Dana RS
- Accu Chek Combo Pump (requires ruffy installation)
- MDI (receive AAPS suggestions for your multiple daily injections therapy)
- Virtual pump (open loop for pump which don’t have any driver yet - AAPS suggestions only)
For dana pumps, use Advanced settings to activate BT watchdog if necessary. It switches off bluetooth for one second if no connection to the pump is possible. This may help on some phones where the bluetooth stack freezes.
Sensitivity Detection
Select the type of sensitivity detection. This will analyze historical data on the go and make adjustments if it recognizes that you are reacting more sensitively (or conversely, more resistant) to insulin than usual. Details about the Sensitivity Oref0 algorithm can be read in the OpenAPS docs.
You can view your sensitivity on the homescreen by selecting SEN and watching the white line. Note, you need to be in Objective 8 in order to use Sensitivity Detection/autosens.
Absorption settings
If you use Oref1 with SMB you must change min_5m_carbimpact to 8. The value is only used during gaps in CGM readings or when physical activity “uses up” all the blood glucose rise that would otherwise cause AAPS to decay COB. At times when carb absorption can’t be dynamically worked out based on your bloods reactions it inserts a default decay to your carbs. Basically, it is a failsafe.
APS
Select the desired APS algorithm for therapy adjustments. You can view the active detail of the chosen algorithm in the OpenAPS(OAPS) tab.
- OpenAPS MA (meal assist, state of the algorithm in 2016)
- OpenAPS AMA (advanced meal assist, state of the algorithm in 2017)More detail about OpenAPS AMA can be found in the OpenAPS docs. In simple terms the benefits are after you give yourself a meal bolus the system can high-temp more quickly IF you enter carbs reliably.Note you need to be in Objective 9 in order to use OpenAPS AMA.
- OpenAPS SMB (super micro bolus, most recent algorithm for advanced users)Note you need to be in Objective 10 in order to use OpenAPS SMB and min_5m_carbimpact must be set to 8 in Config builder > Sensitivity detection > Sensitivity Oref1 settings.
Loop
Define whether you want to allow AAPS automatic controls or not.
Open Loop
AAPS continuously evaluates all available data (IOB, COB, BG...) and makes treatment suggestions on how to adjust your therapy if necessary. The suggestions will not be executed automatically (as in closed loop) have to be entered manually into the pump or by using a button in case you are using a compatible pump (Dana R/RS or Accu Chek Combo). This option is for getting to know how AndroidAPS works or if you are using an unsupported pump.
Closed Loop
AAPS continuously evaluates all available data (IOB, COB, BG...) and automatically adjusts the treatment if necessary (i.e. without further intervention by you) to reach the set target range or value (bolus delivery, temporary basal rate, insulin switch-off to avoid hypo etc.). The Closed Loop works within numerous safety limits, which you can be set individually. Closed Loop is only possible if you are in Objective 6 or higher and use a supported pump.
Objectives (learning program)
AndroidAPS has a number of objectives that you have to fulfill step by step. This should guide you safely through setting up a closed loop system. It guarantees that you have set everything up correctly and understand what the system does exactly. This is the only way you can trust the system.
You should export your settings (including progress of the objectives) on a regularly basis. In case you have to replace your smartphone later (new purchase, display damage etc.) you can simply import those settings.
See Objectives page for more information.
Treatments
If you view the Treatments (Treat) tab, you can see the treatments that have been uploaded to nightscout. Should you wish to edit or delete an entry (e.g. you ate less carbs than you expected) then select ‘Remove’ and enter the new value (change the time if necessary) through the Careportal (CP) tab.
Ogólnie
Overview
Displays the current state of your loop and buttons for most common actions (see section The Homescreen for details). Settings can be accessed by clicking the cog wheel.
Keep screen on
Option ‘Keep screen on’ will force Android to keep the screen on at all times. This is useful for presentations etc. But it consumes a lot of battery power. Therefore, it is recommended to connect the smartphone to a charger cable.
Buttons
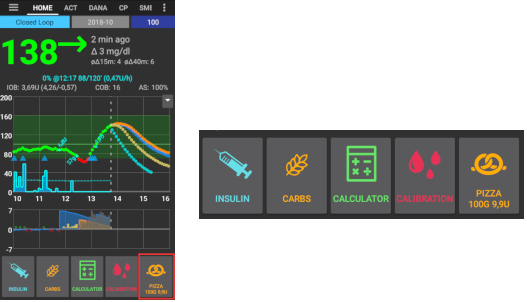
Define which Buttons are shown on the home screen.
- Treatments
- Kalkulator
- Insulin
- Carbs
- CGM (opens xDrip+)
- Calibration
Furthermore, you can set shortcuts for insulin and carb increments and decide whether the notes field should be shown in treatment dialogues.
QuickWizard settings
Create a button for a certain standard meal (carbs and calculation method for the bolus) which will be displayed on the home screen. Use for standard meals frequently eaten. If different times are specified for the different meals you will always have the appropriate standard meal button on the home screen, depending on the time of day.
Note: Button will not be visible if outside the specified time range or if you have enough IOB to cover the carbs defined in the QuickWizard button.
Advanced settings
Enable super bolus functionality in wizard. Use with caution and do not enable until you learn what it really does. Basically, the basal for the next two hours is added to the bolus and a two hour zero-temp activated. AAPS looping functions will be disabled - so use with care! If you use SMB AAPS looping functions will be disabled according to your settings in “Max minutes of basal to limit SMB to”, if you do not use SMB looping functions will be disabled for two hours. Details on super bolus can be found here.
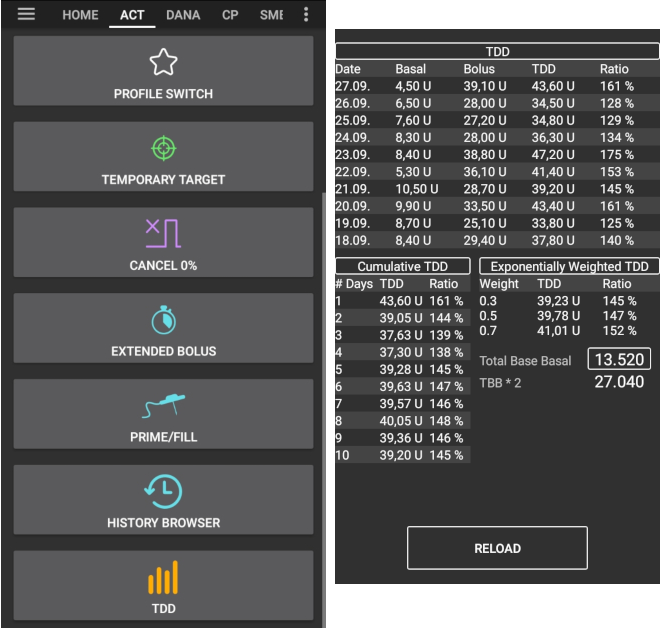
Actions
Some buttons to quickly access common features:
- Profiles Switch (see Profiles page for more setup information)
- Temporary targets
- Set / cancel temp. dawka bazowa
- Extended bolus (DanaR/RS or Combo pump only)
- Prime / fill (if supported by pump [DanaR/RS, Combo and Insight])
- History browser
- TDD (Total daily dose = bolus + basal per day)
Some doctors use - especially for new pumpers - a basal-bolus-ratio of 50:50. Therefore ratio is calculated as TDD / 2 * TBB (Total base basal = sum of basal rate within 24 hours). Others prefer range of 32% to 37% of TDD for TBB. Like most of these rules-of-thumb it is of limited real validity. Note: Your diabetes may vary!
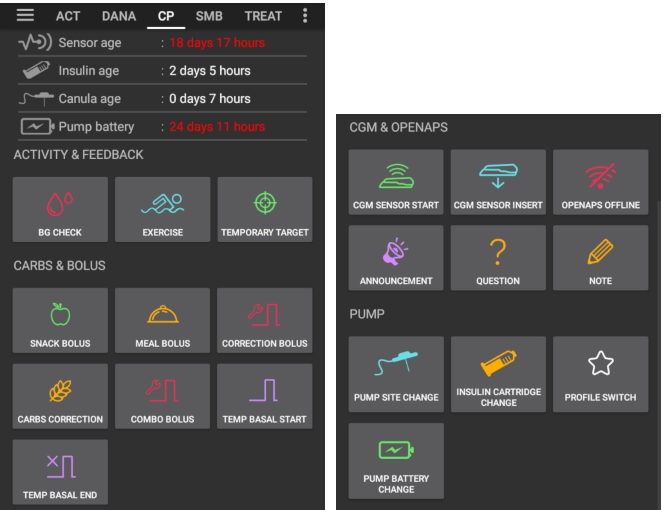
Careportal
Allows you to record any specific care entries and view the current sensor, insulin, canula and pump battery ages in the Careportal (CP) tab.
Note: No insulin will be given if entered via careportal (i.e. meal bolus, correction bolus...)
Carbs entered in the careportal (i.e. correction carbs) will be used for COB calculation.
SMS Communicator
Allows remote caregivers to control some AndroidAPS features via SMS, see SMS Commands for more setup information.
Food
Displays the food presets defined in the Nightscout food database, see Nightscout Readme for more setup information.
Note: Entries cannot be used in the AndroidAPS calculator. (View only)
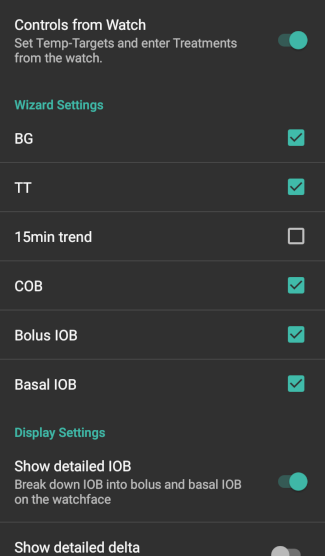
Wear
Monitor and control AAPS using your Android Wear watch (see page Watchfaces). Use settings (cog wheel) to define which variables should be considered when calculating bolus given though your watch (i.e. 15min trend, COB...).
If you want to bolus etc. from the watch then within “Wear settings” you need to enable “Controls from Watch”.
Through Wear tab or hamburger menu (top left of screen, if tab is not displayed) you can
- Resend all data. Might be helpful if watch was not connected for some time and you want to push the information to the watch.
- Open settings on your watch directly from your phone.
xDrip Statusline (watch)
Display loop information on your xDrip+ watchface (if you are not using AAPS/AAPSv2 watchface
Ongoing Notification
Displays a summary of current BG, delta, active TBR%, active basal u/h and profile, IOB and split into bolus IOB and basal IOB on the phones’s dropdown screen and phone’s lock screen.

NS Client
Setup sync of your AndroidAPS data with Nightscout.
If Log app start to NS is activated each AndroidAPS will be visible in Nightscout. Might be useful to detect problems with the app (i.e. battery optimization not disabled for AAPS) but can flood the Nightscout graph with entries.
Connection settings
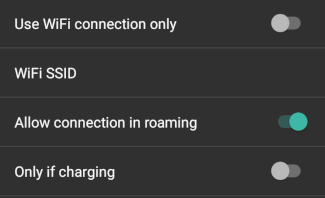
Offline looping, disable roaming...
If you want to use only a specific WiFi network you can enter its **WiFi SSID **. Several SSIDs can be separated by semicolon. To delete all SSIDs enter a blank space in the field.
Advanced settings
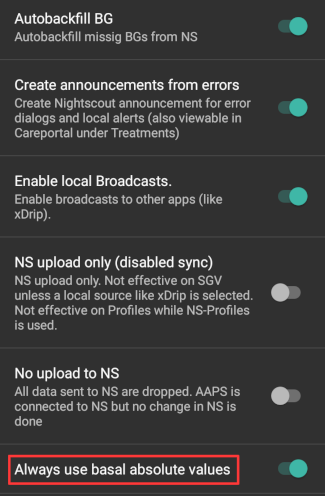
- Auto backfill missing BGs from Nightscout
- Create announcement from errors Create Nightscout announcement for error dialogs and local alerts (also viewable in careportal in treatments section)
- Enable local broadcast to other apps like xDrip+
- NS upload only (sync disabled)
- No upload to NS
- Always use basal absolute values -> Must be activated if you want to use Autotune properly.
Maintenance
Email and number of logs to be send. Normally no change necessary.
Kreator konfiguracji
Use tab for config builder instead of hamburger menu.