Faire votre premier PR (Pull Request)
Cette description est juste pour l’édition de la documentation en anglais. Si vous voulez traduire la documentation dans d’autres langues (merci), utilisez crowdin.
For hints how to format text (headline, bold...) and set links please see the “code syntax” section of this page.
Généralités
Pour toute question, commentaires ou idées nouvelles, vous pouvez contacter l’équipe de documentation par e-mail (wiki@androidaps.org). Faire un PR n’est pas difficile, mais nous pouvons vous aider à éditer la documentation.
À un moment donné, on vous suggère de faire un PR. PR est l’acronyme de Pull Request, et c’est une façon d’ajouter ou de modifier des informations enregistrées dans GitHub. En fait, ce n’est pas si difficile à faire et c’est une excellente façon de contribuer. Cette documentation est ici parce que les gens comme vous ont fait des PRs. Ne craignez pas de vous tromper ou d’éditer les mauvais documents. Il y a toujours un processus de vérification avant que les modifications ne soient fusionnées dans le référentiel “formel” de la documentation AndroidAPS. Vous ne pouvez pas endommager les originaux si vous faites des erreurs lors du processus de PR. Le processus général est :
- Apportez des modifications au code ou à la documentation en modifiant le contenu existant.
- Vérifiez deux fois que vos modifications vous semblent bonnes.
- Prenez quelques notes sur ce qui a changé afin que les personnes puissent comprendre les modifications.
- Créer un Pull Request, qui demande aux administrateurs d’utiliser vos modifications.
- Ils feront une vérification et soit (1) ils fusionneront vos modifications, (2) ils vous feront un retour au sujet de vos modifications, ou (3) ils commenceront un nouveau document avec vos modifications.
(Remarque : Si vous êtes un apprenant visuel, il y a une vidéo YouTube ici montrant le flux de travail PR.)
Pour notre exemple, nous allons faire une modification à AndroidAPSdocs. Cela ne doit PAS être fait dans l’environnement linux de votre plateforme. Cela peut être fait sur n’importe quel PC Windows, Mac, etc. (n’importe quel ordinateur avec un accès à Internet).
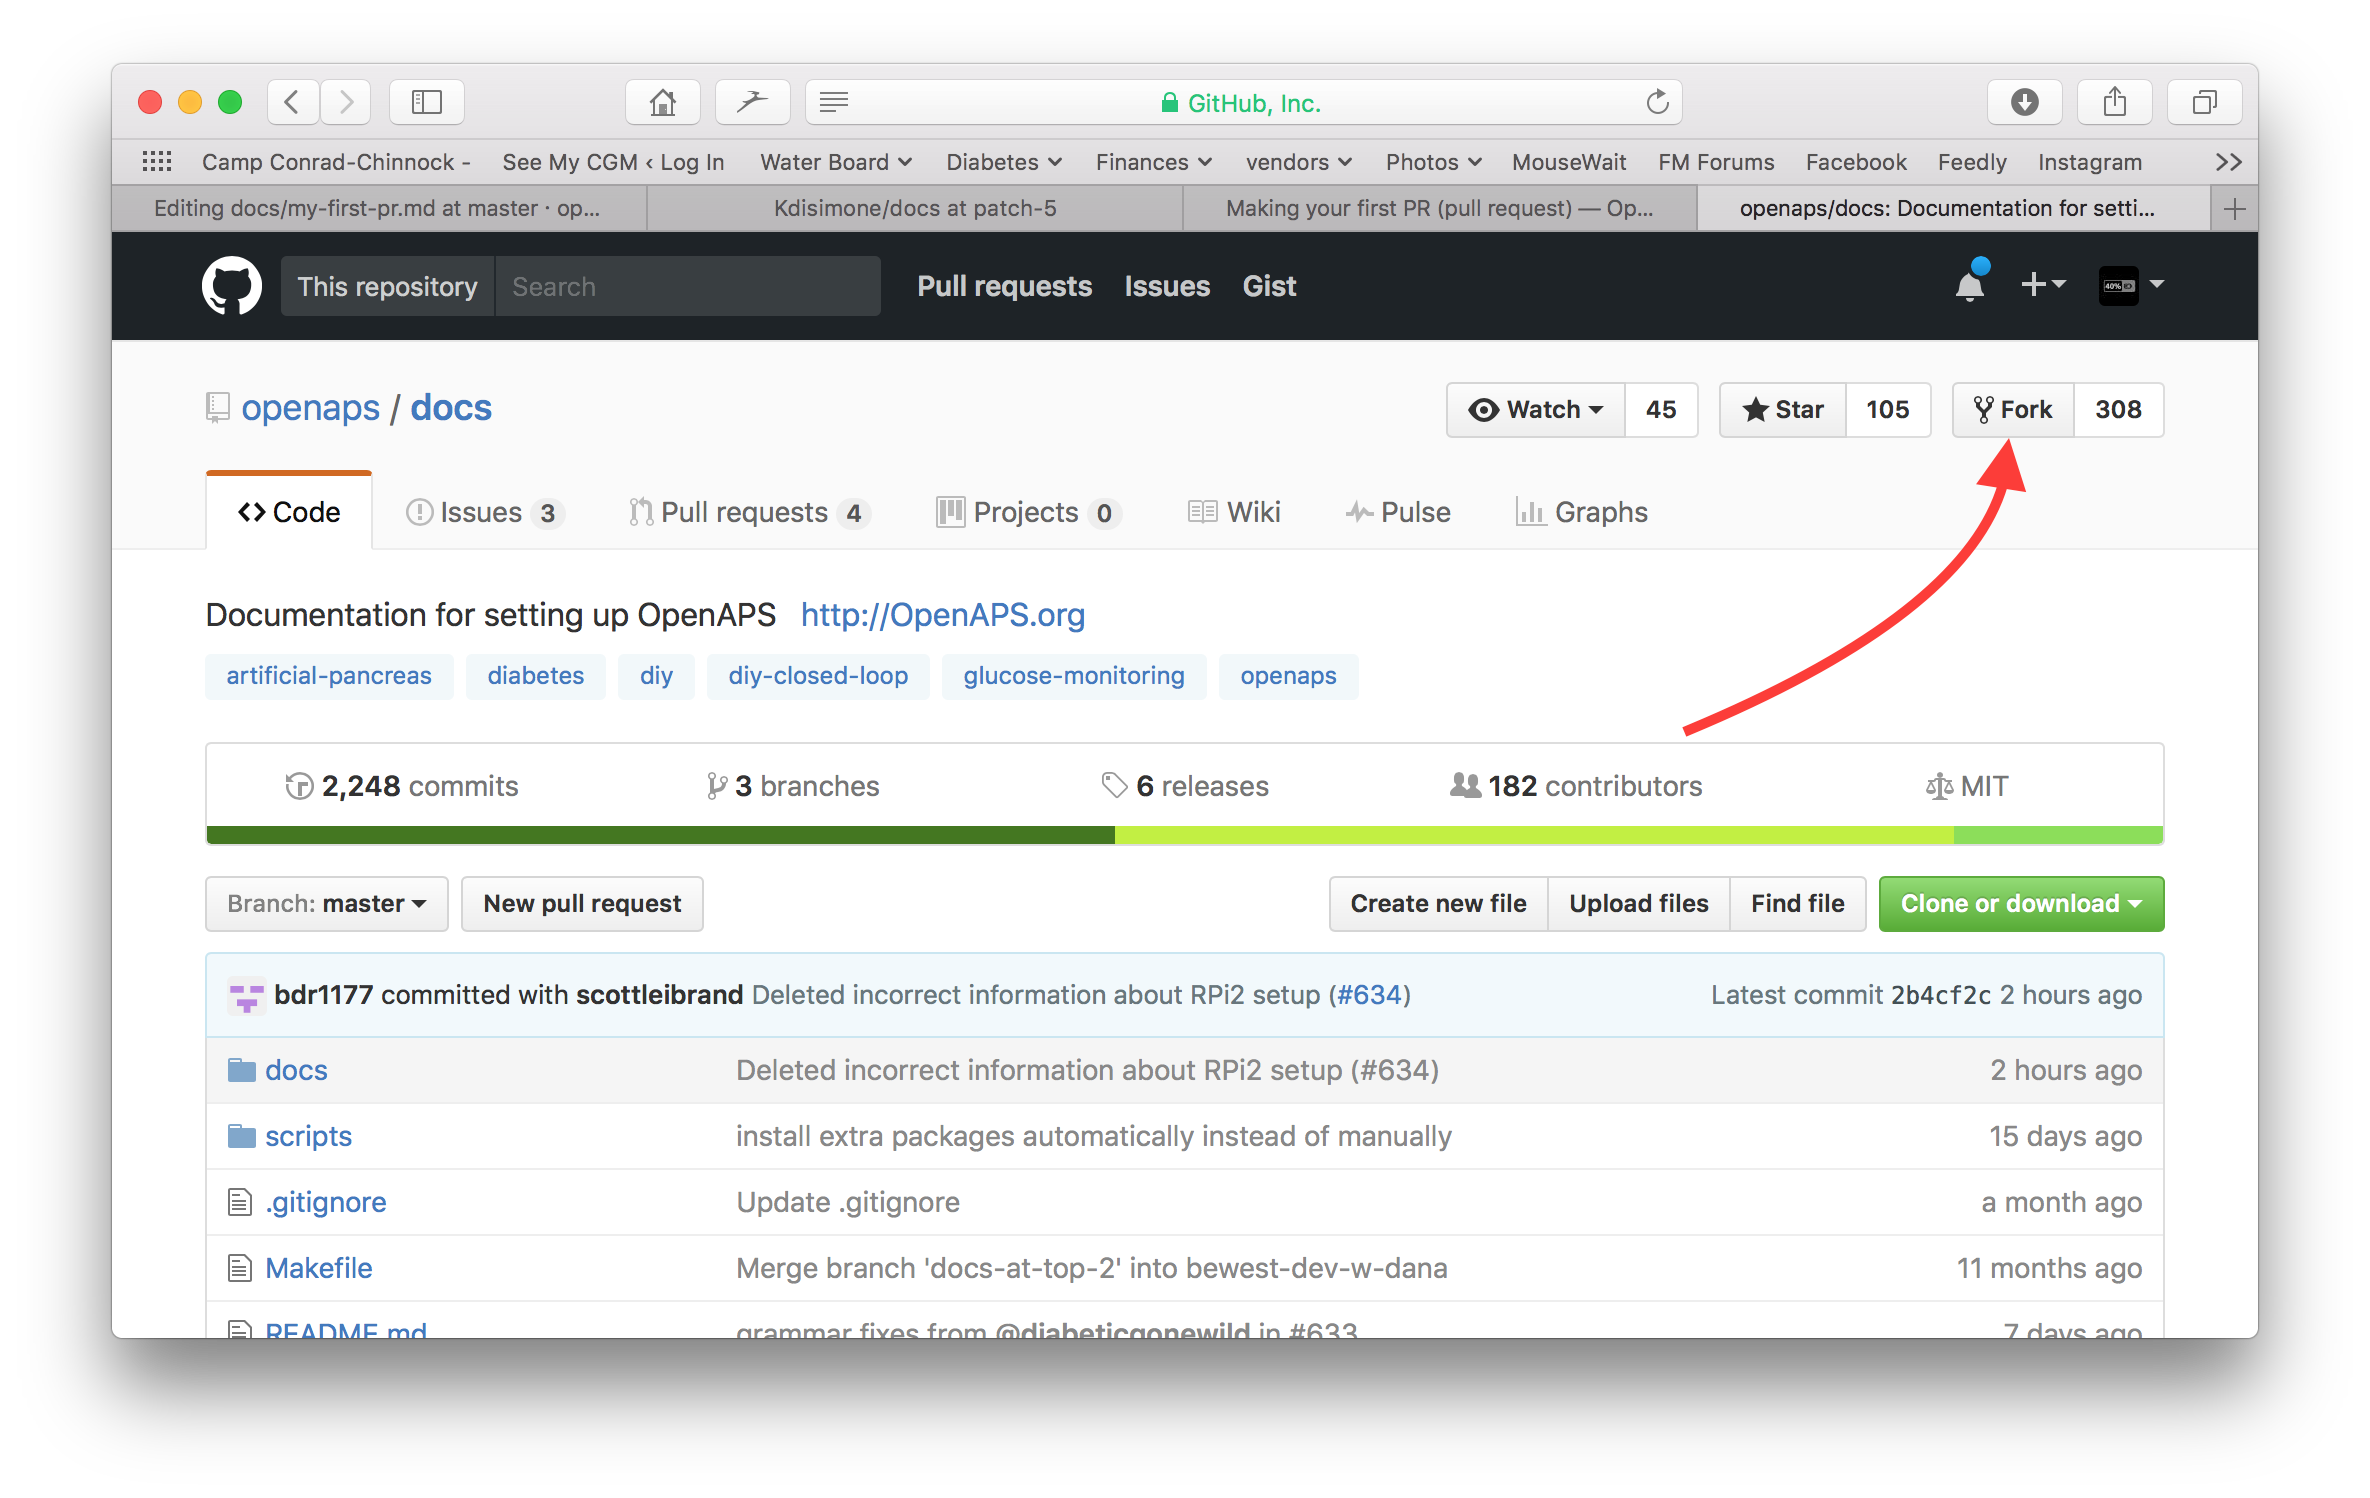
- Accédez à https://github.com/openaps/AndroidAPSdocs et appuyez sur Fork en haut à droite pour faire votre propre copie du référentiel.
- Accédez à http://androidaps.readthedocs.io/en/latest/Getting-Started/Safety-first.html ou autre et accédez à la page que vous souhaitez éditer. Cliquez sur la boîte noire en bas à gauche de la page avec le mot vert “v: latest” ou similaire. In the pop up window that appears, click the word “edit” for editing in GitHub.
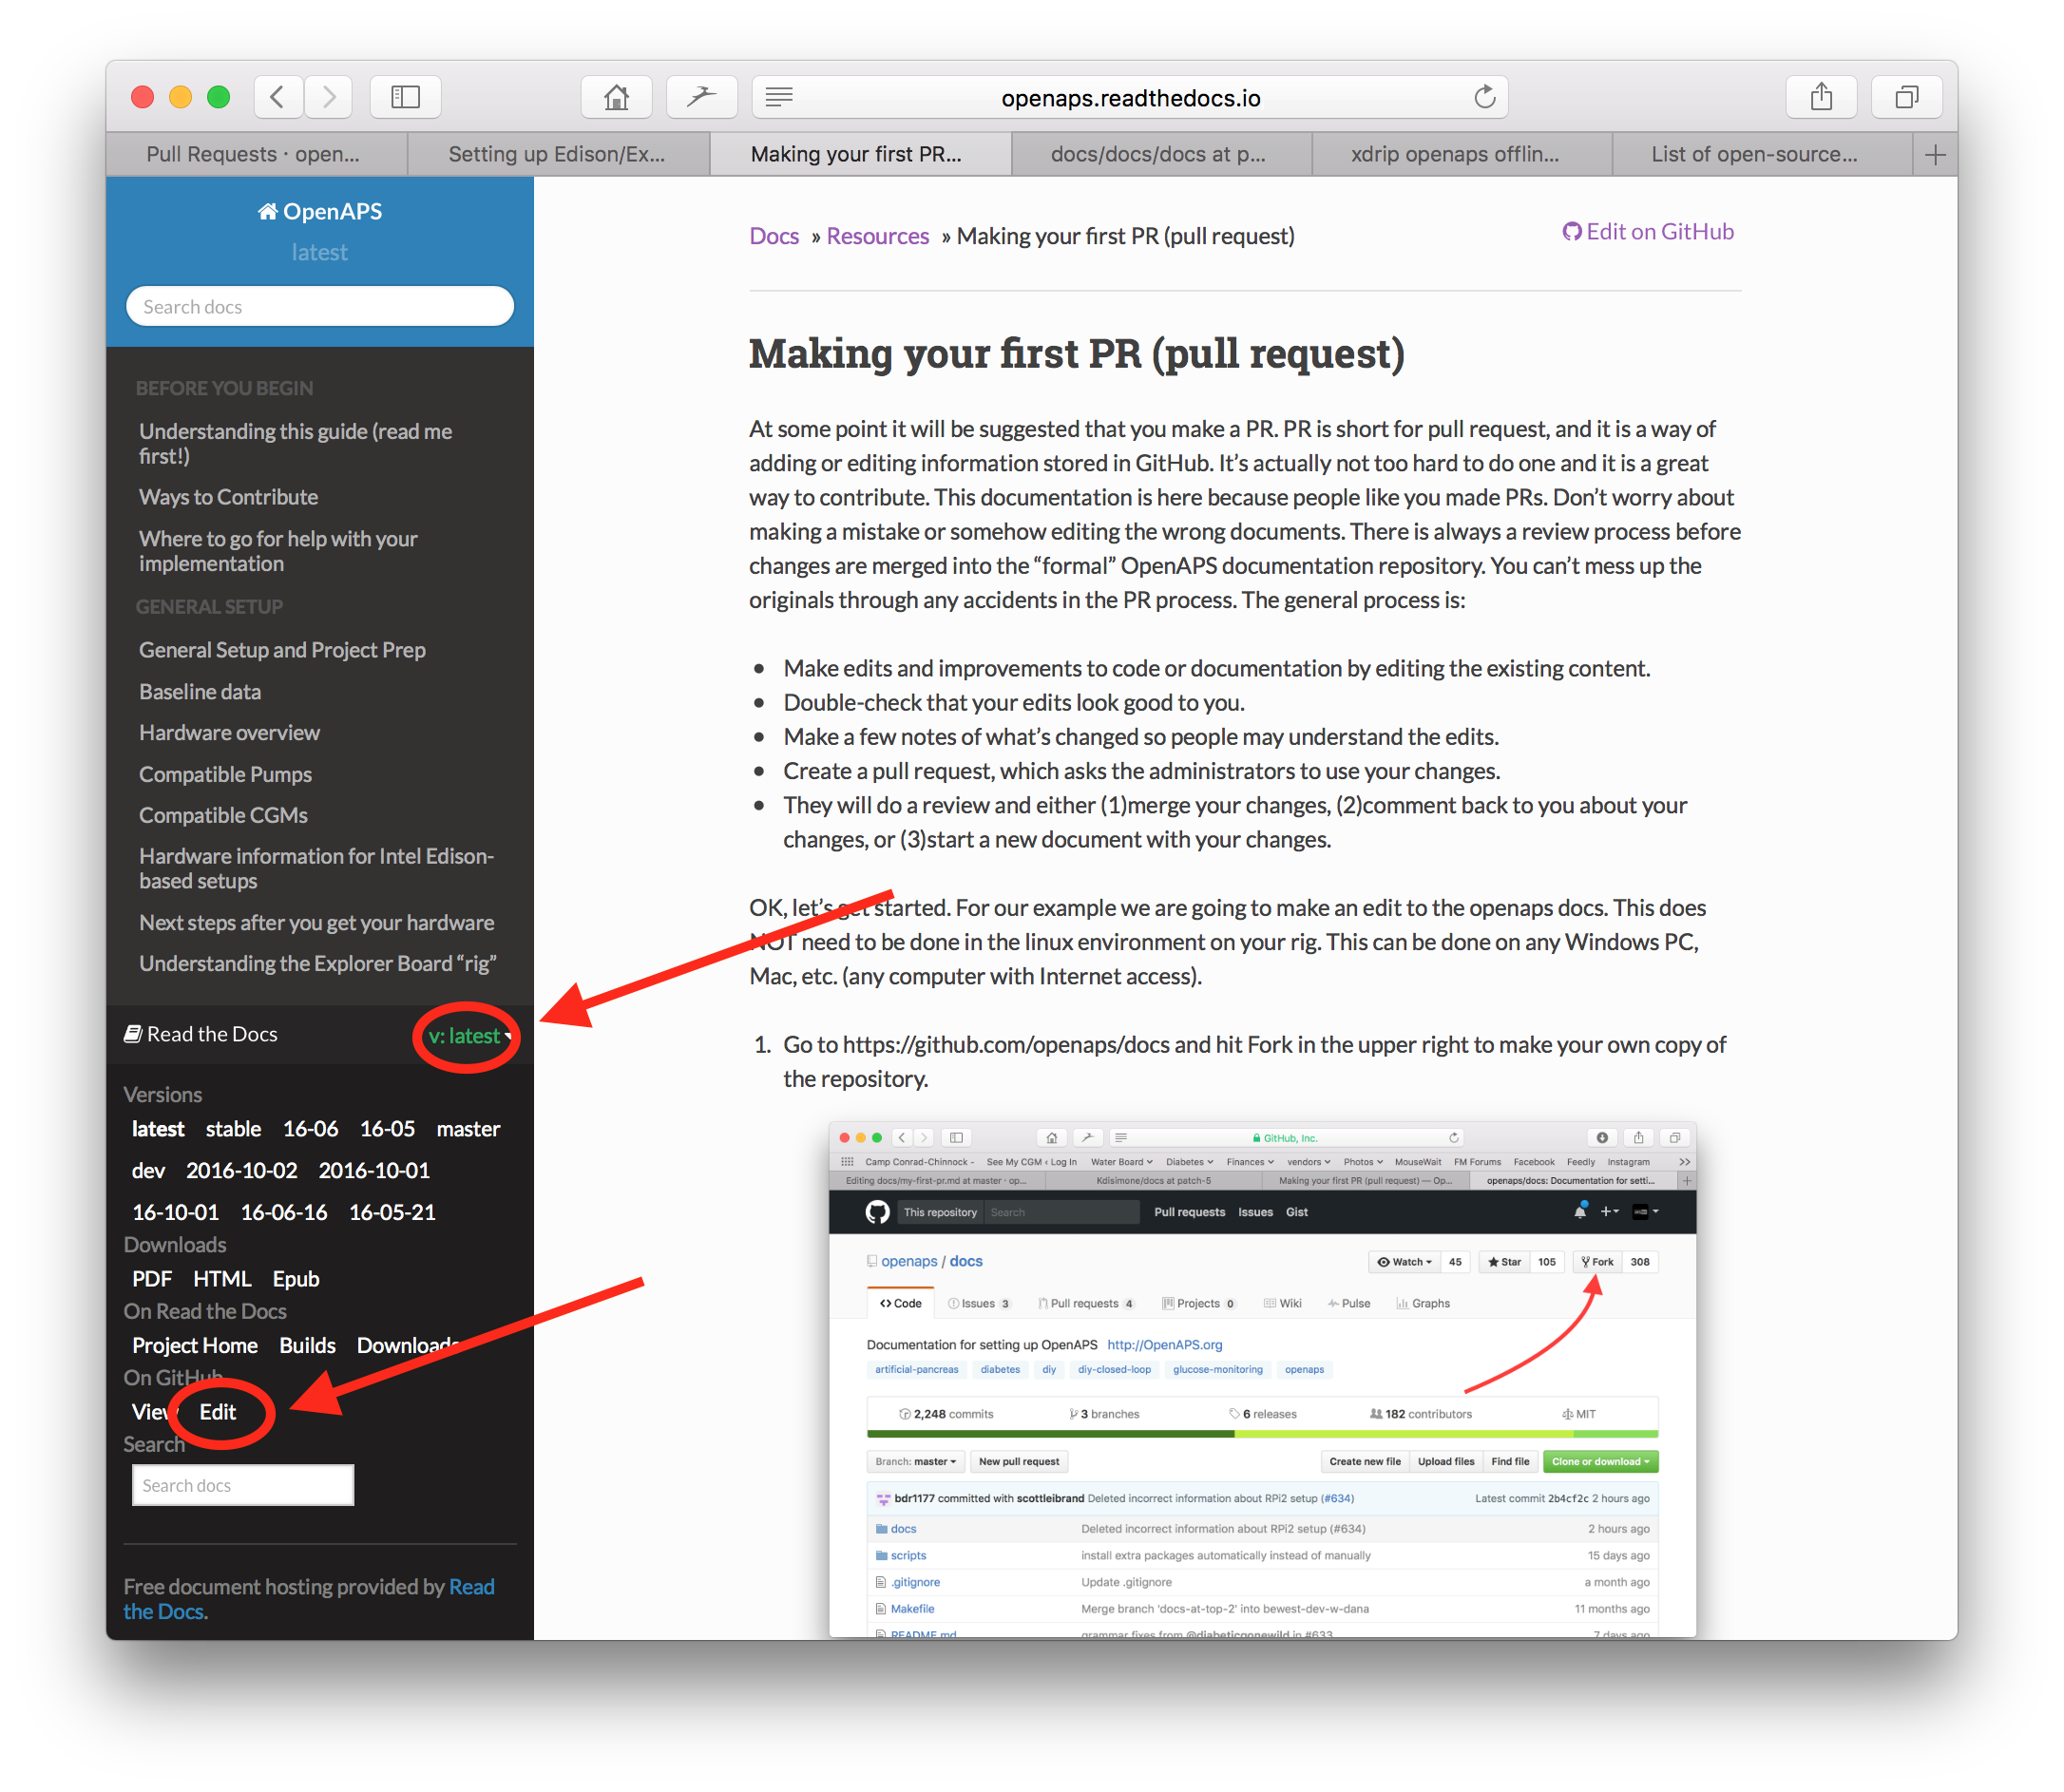
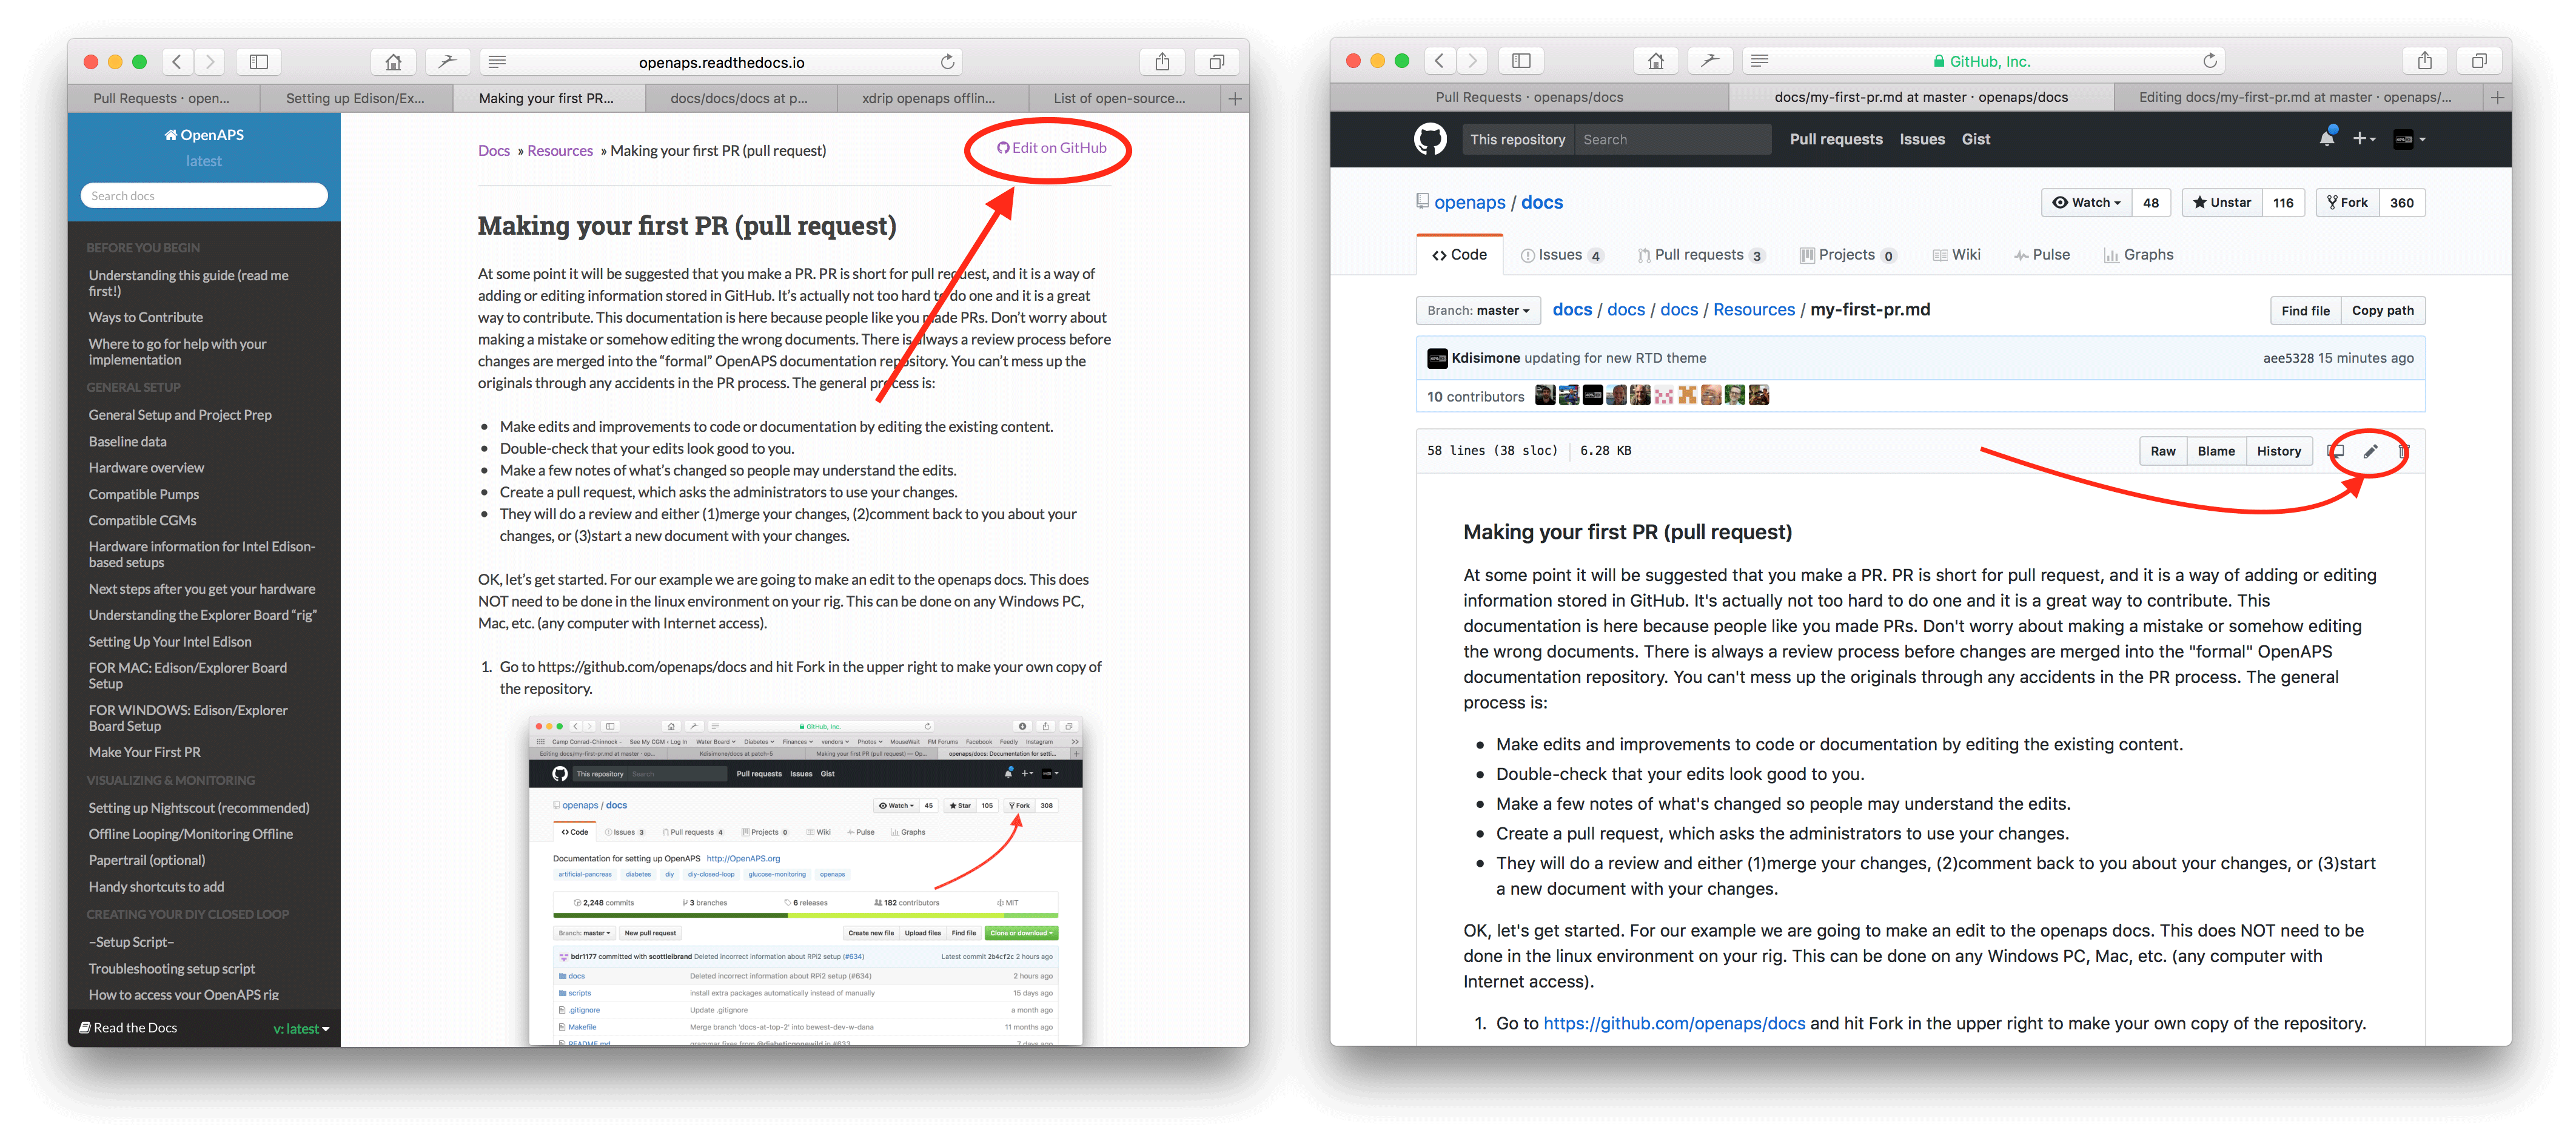
Or you can click on the "Edit in Github" link in the upper right corner, and then click the pencil icon that appears in the top bar of the page contents to be edited.
- L’une ou l’autre des options de l’étape 2 créera une nouvelle branche dans le référentiel où vos modifications seront enregistrées. Effectuez vos modifications dans le fichier.
Be aware that we use different file extensions: .rst (ReStructuredText) and .md (Markdown) and the syntax varies a little bit between the two. Take care to use the correct syntax as described below.
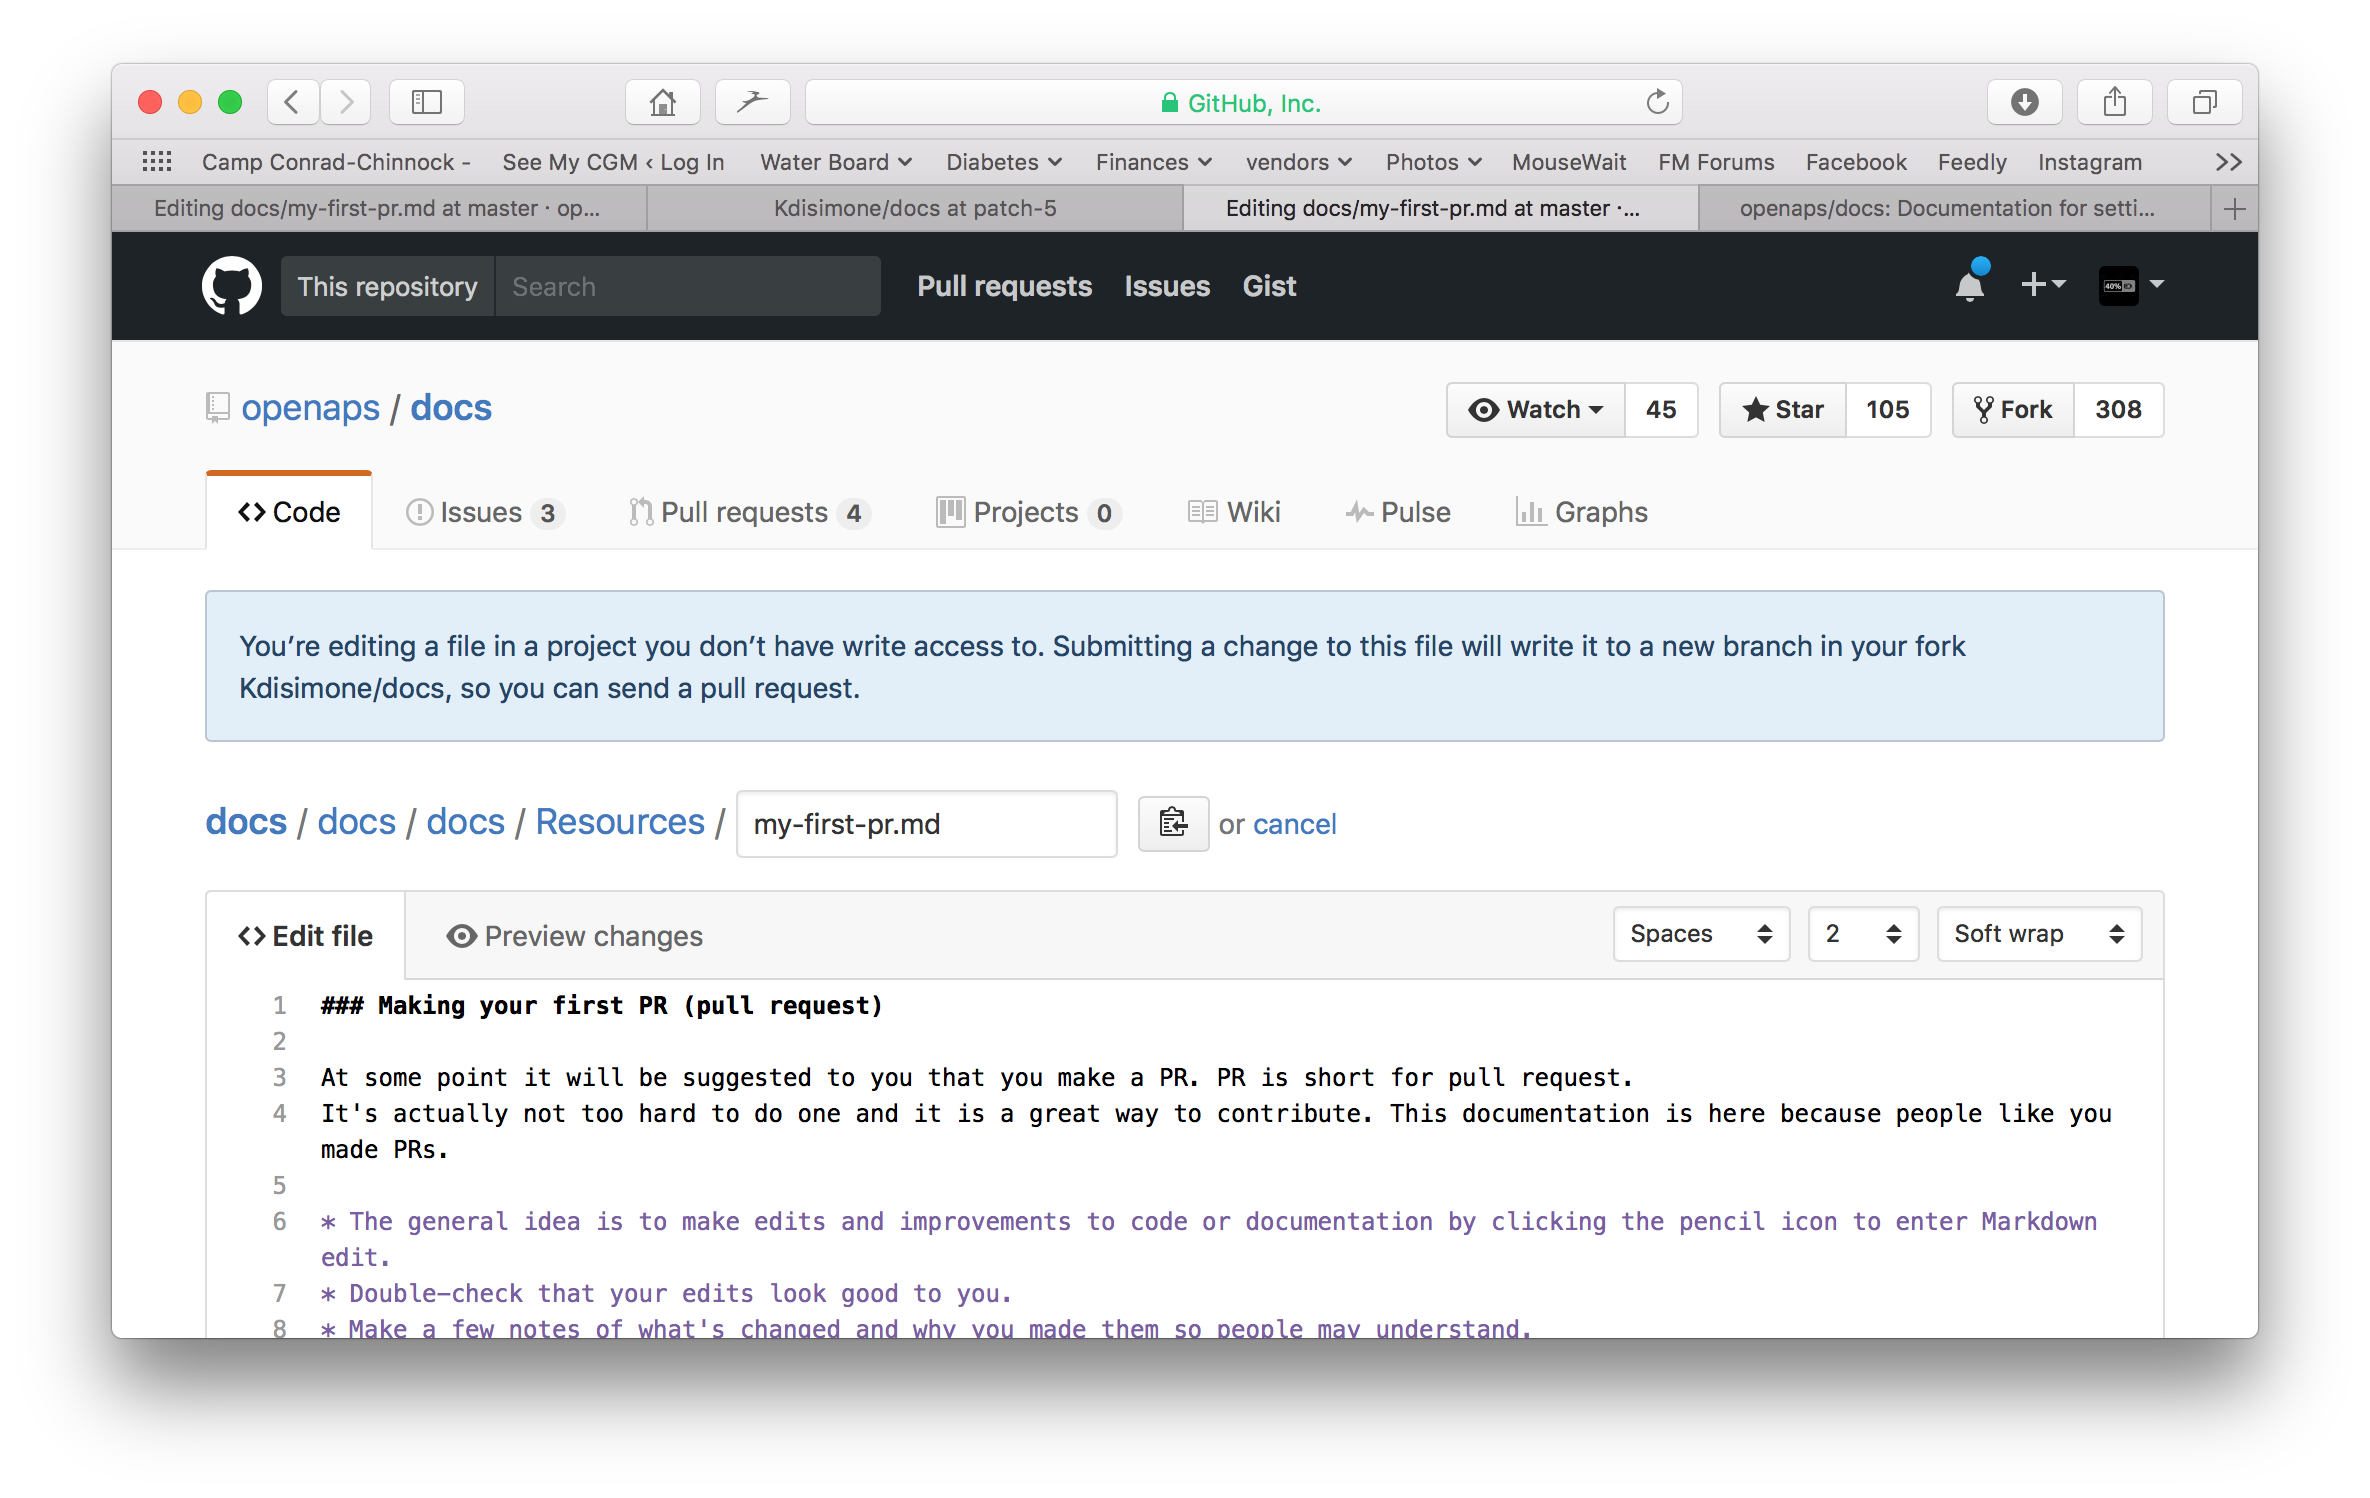
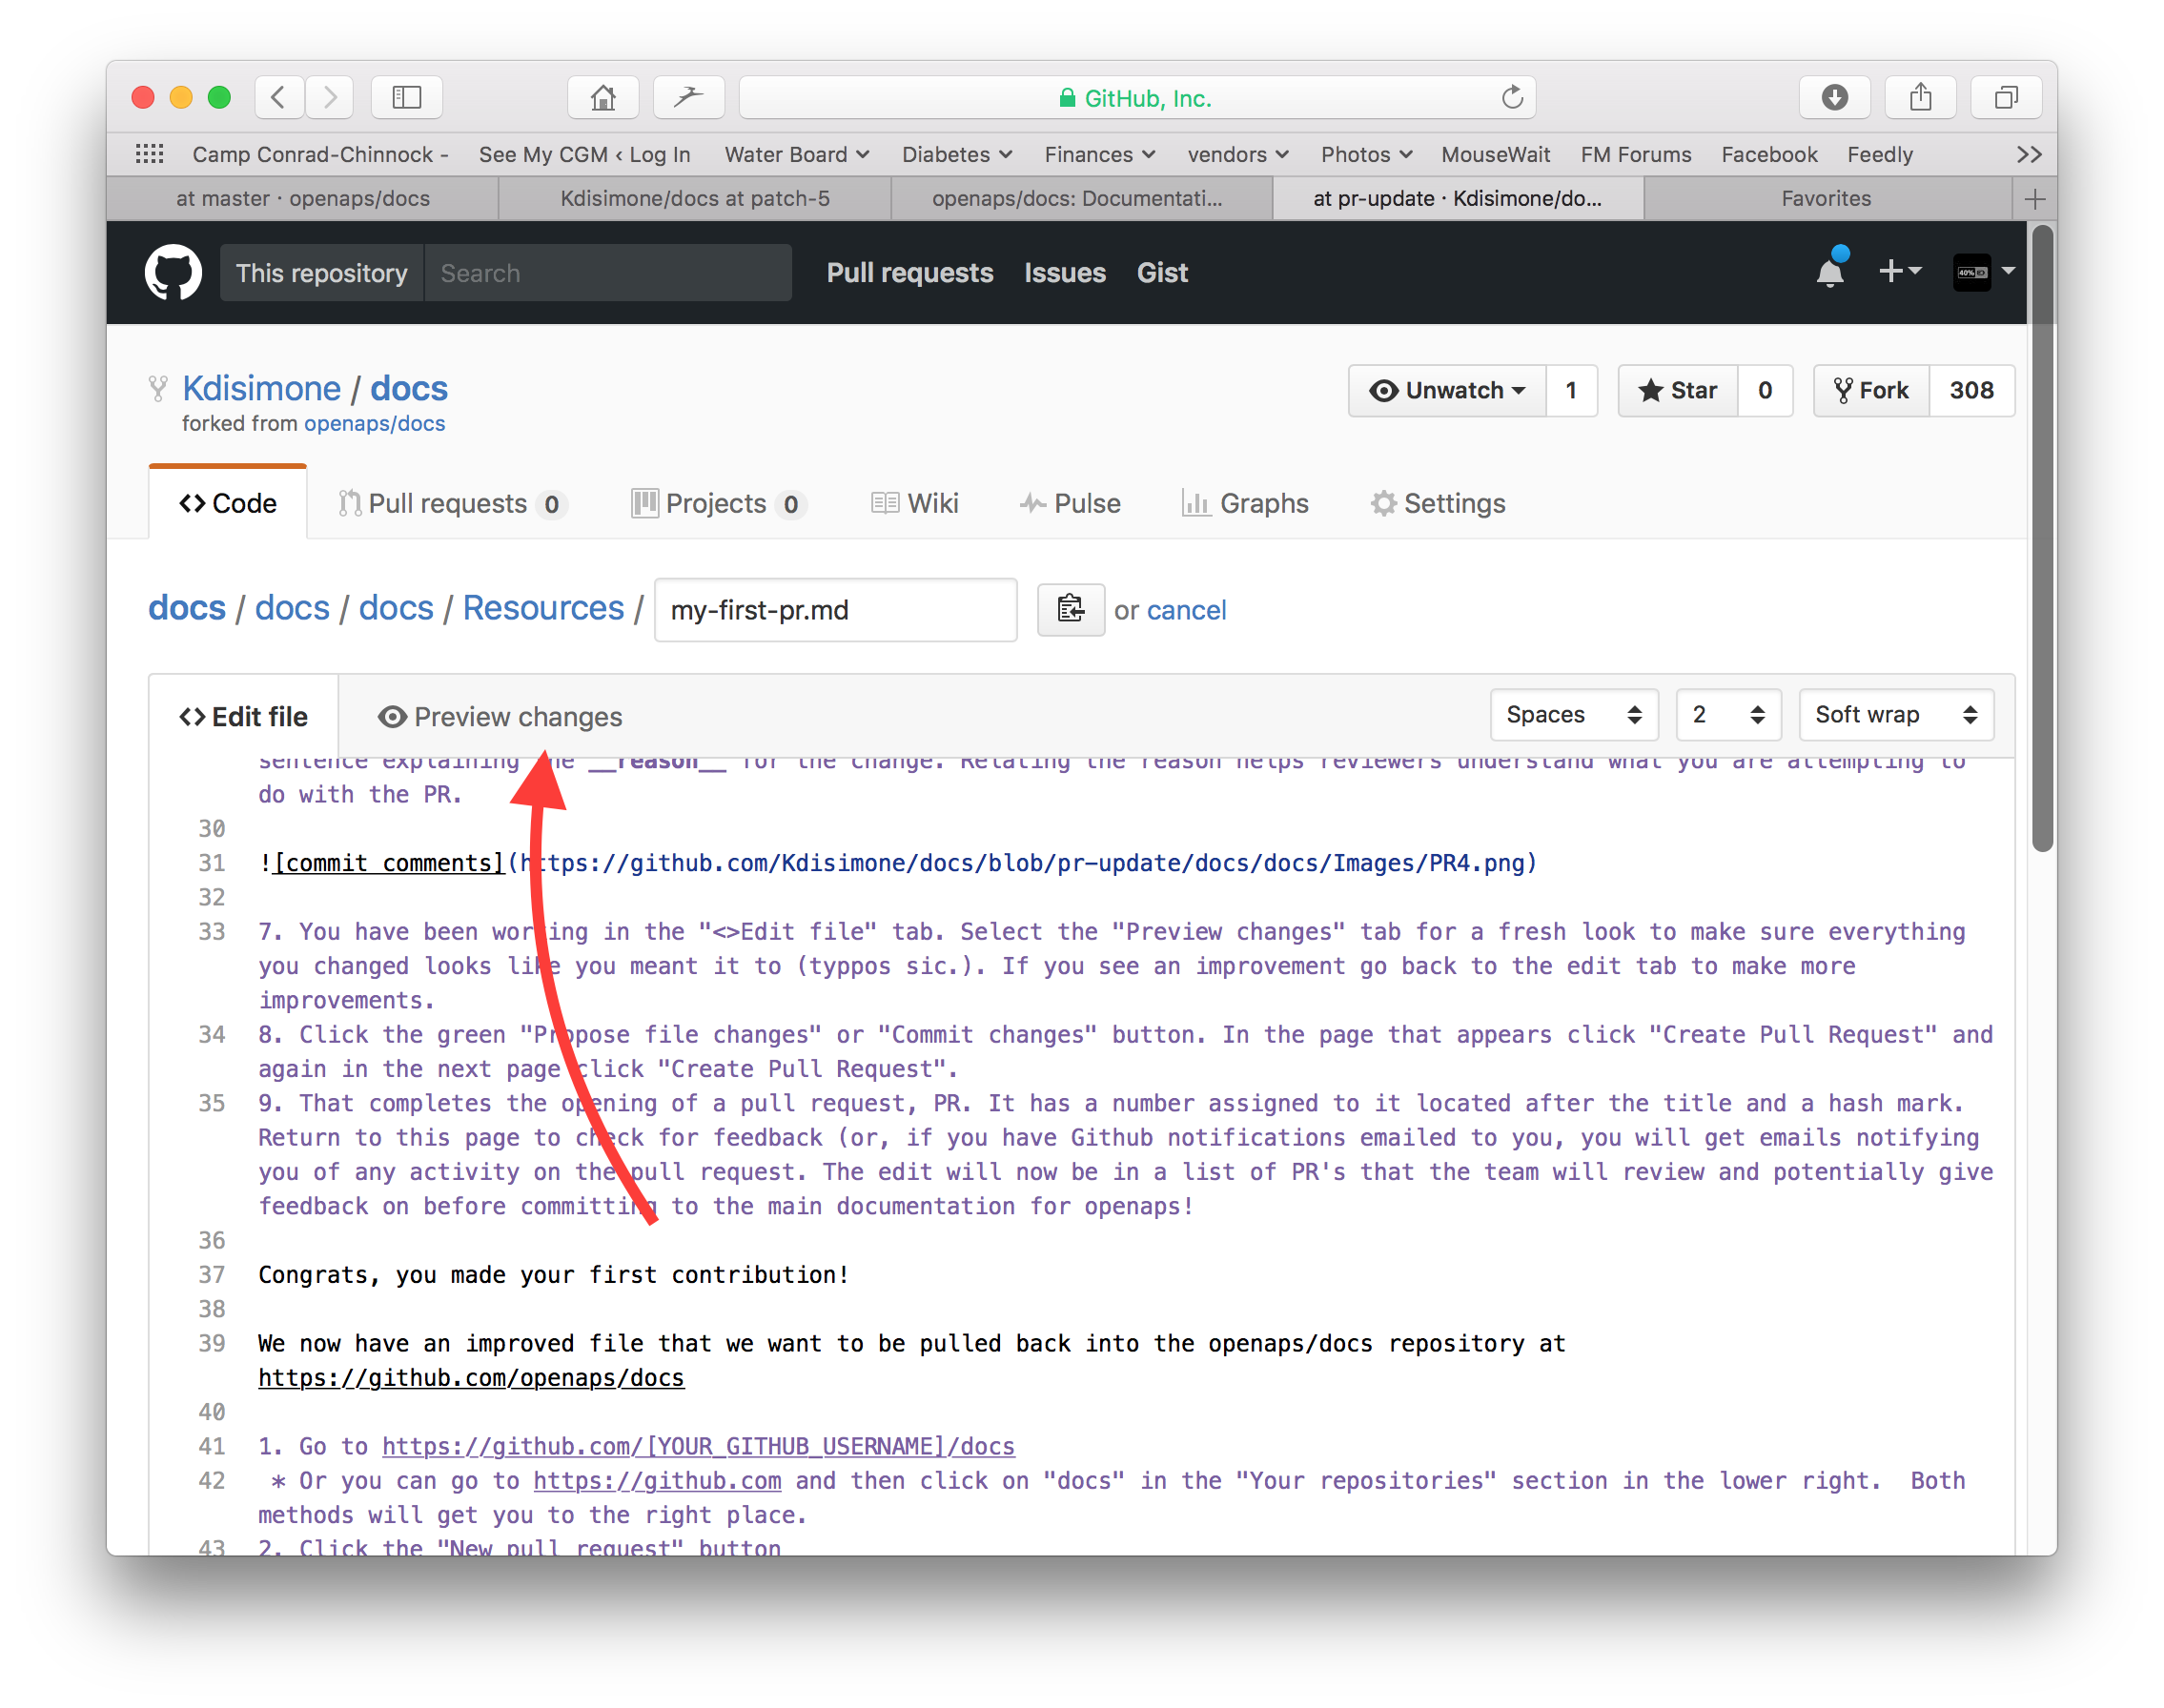
- Vous avez travaillé dans l’onglet “<>Edit file”. Select the “Preview changes” tab for a fresh look to make sure everything you changed looks like you meant it to (typpos sic.). If you see a needed improvement, go back to the edit tab to make more improvements.
- When you have finished your edits, scroll to the bottom of the page. In the box at the bottom, provide your comments in the text field that reads, “Add an optional extended description...”. The default title has the file name. Try to include a sentence explaining the reason for the change. Relating the reason helps reviewers understand what you are attempting to do with the PR.
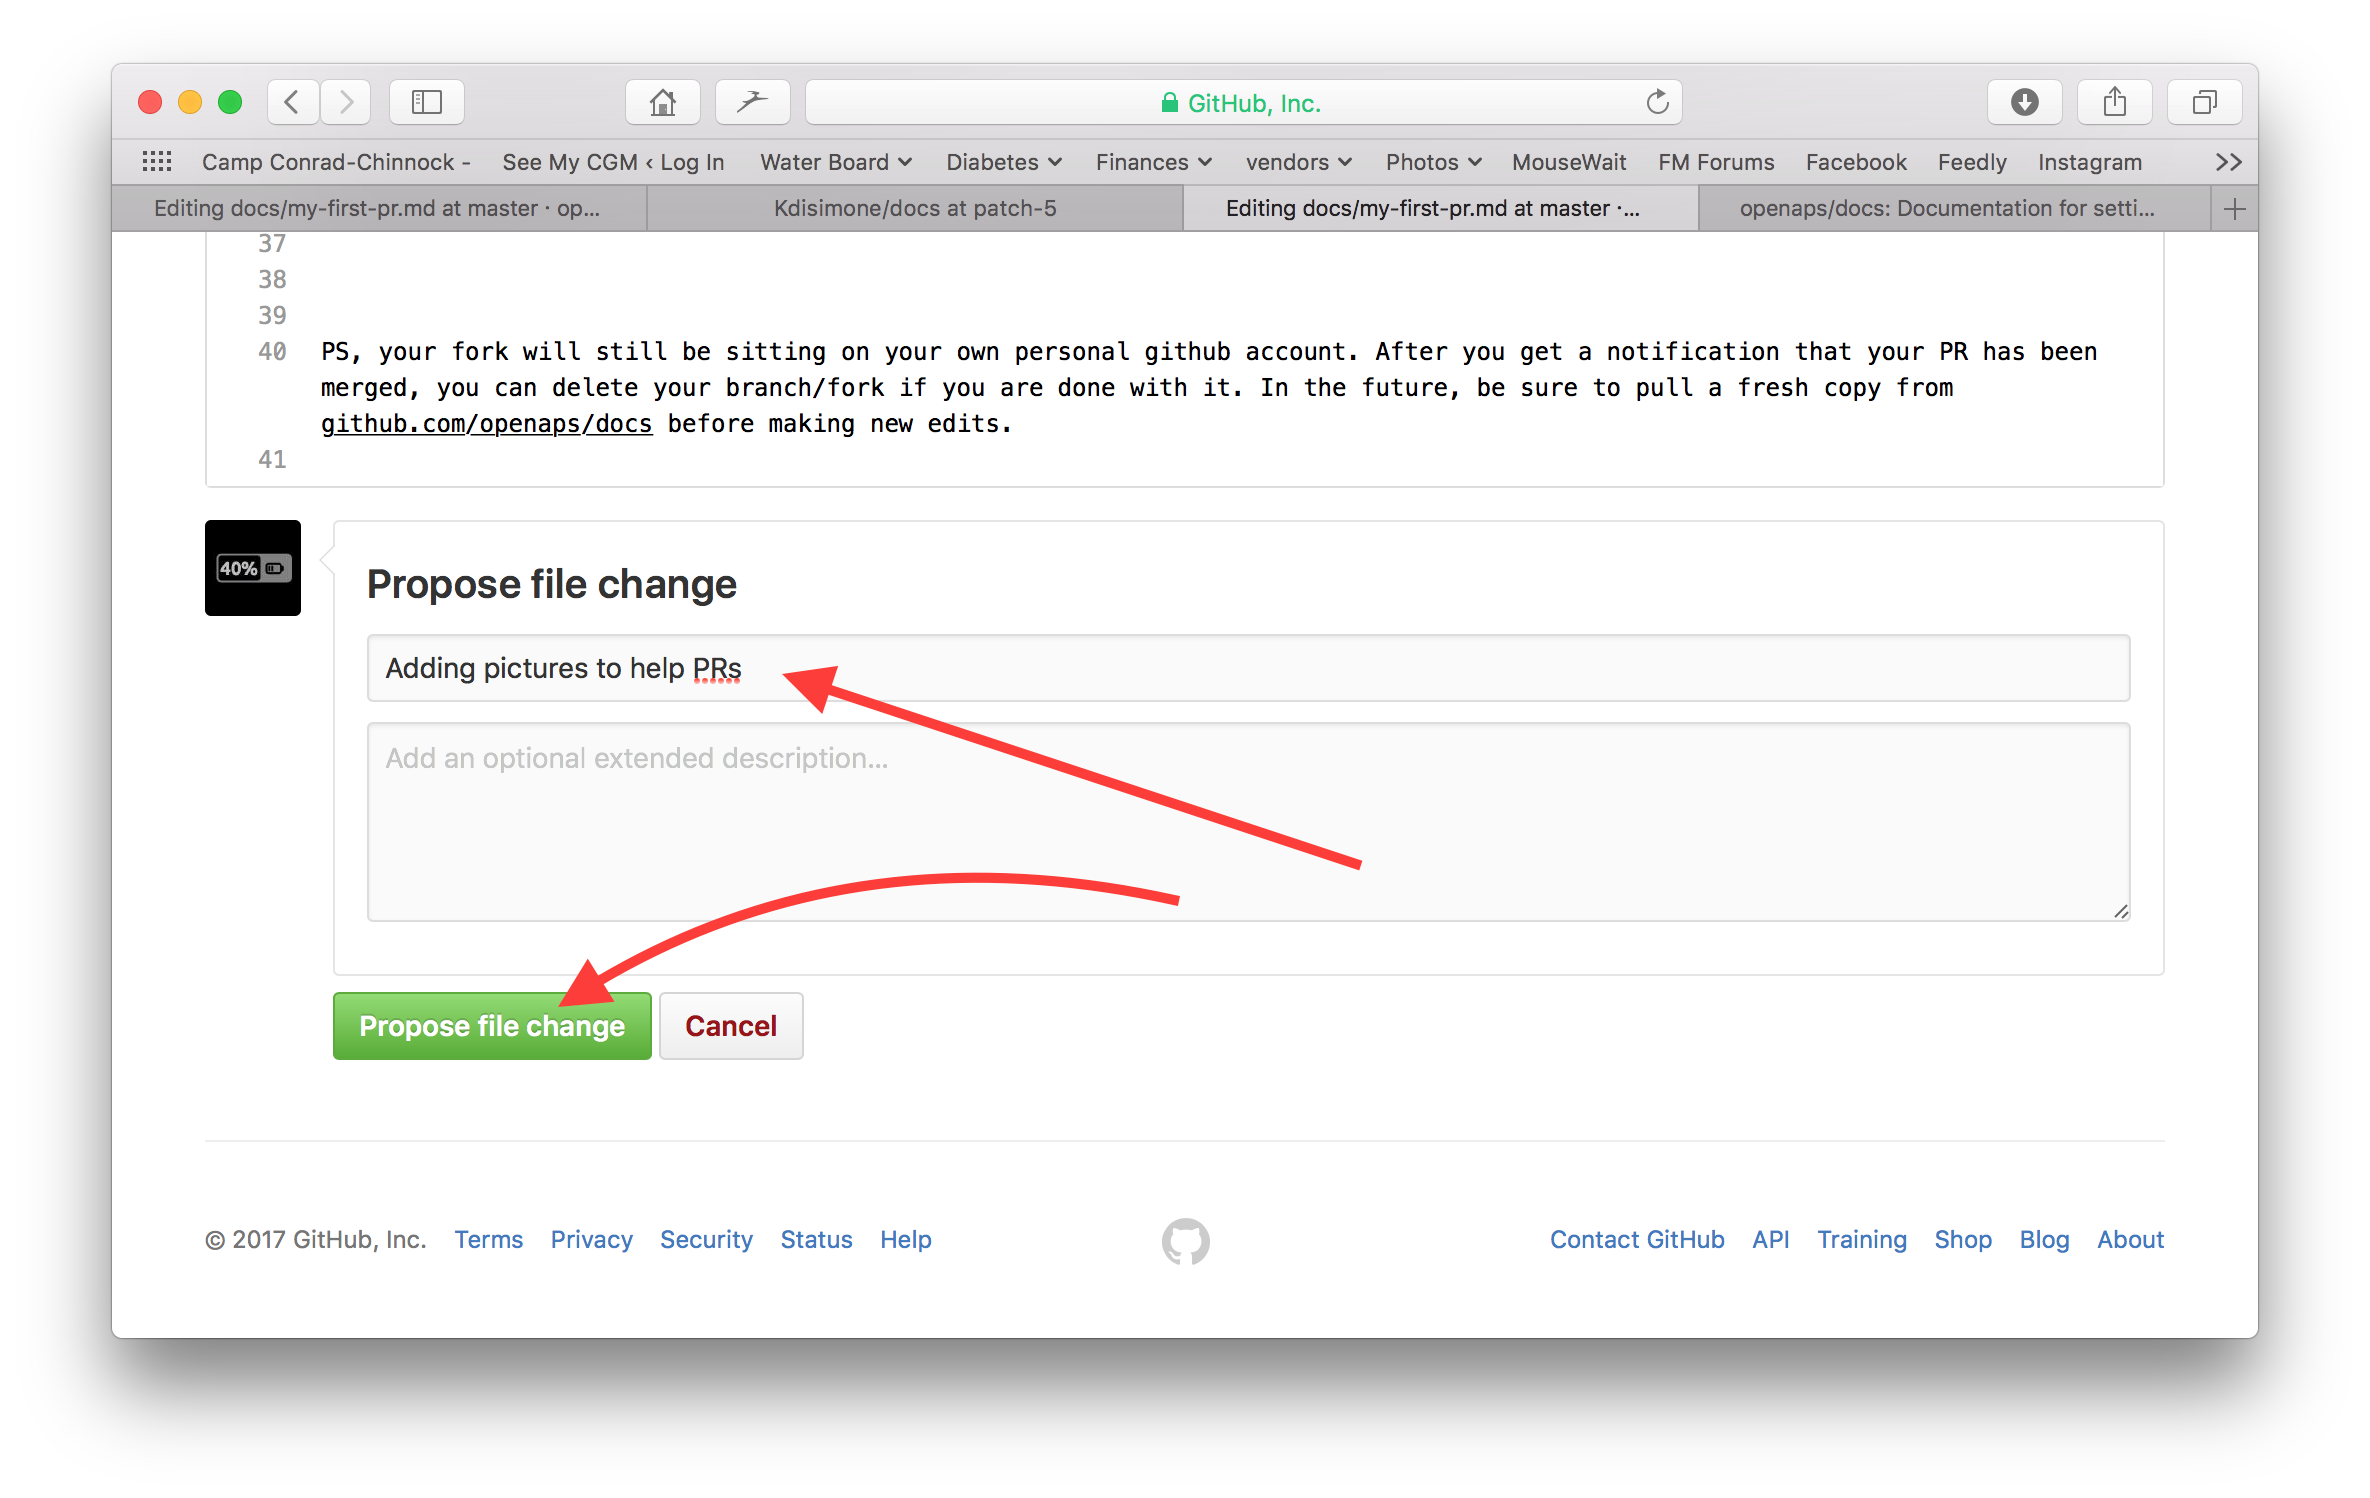
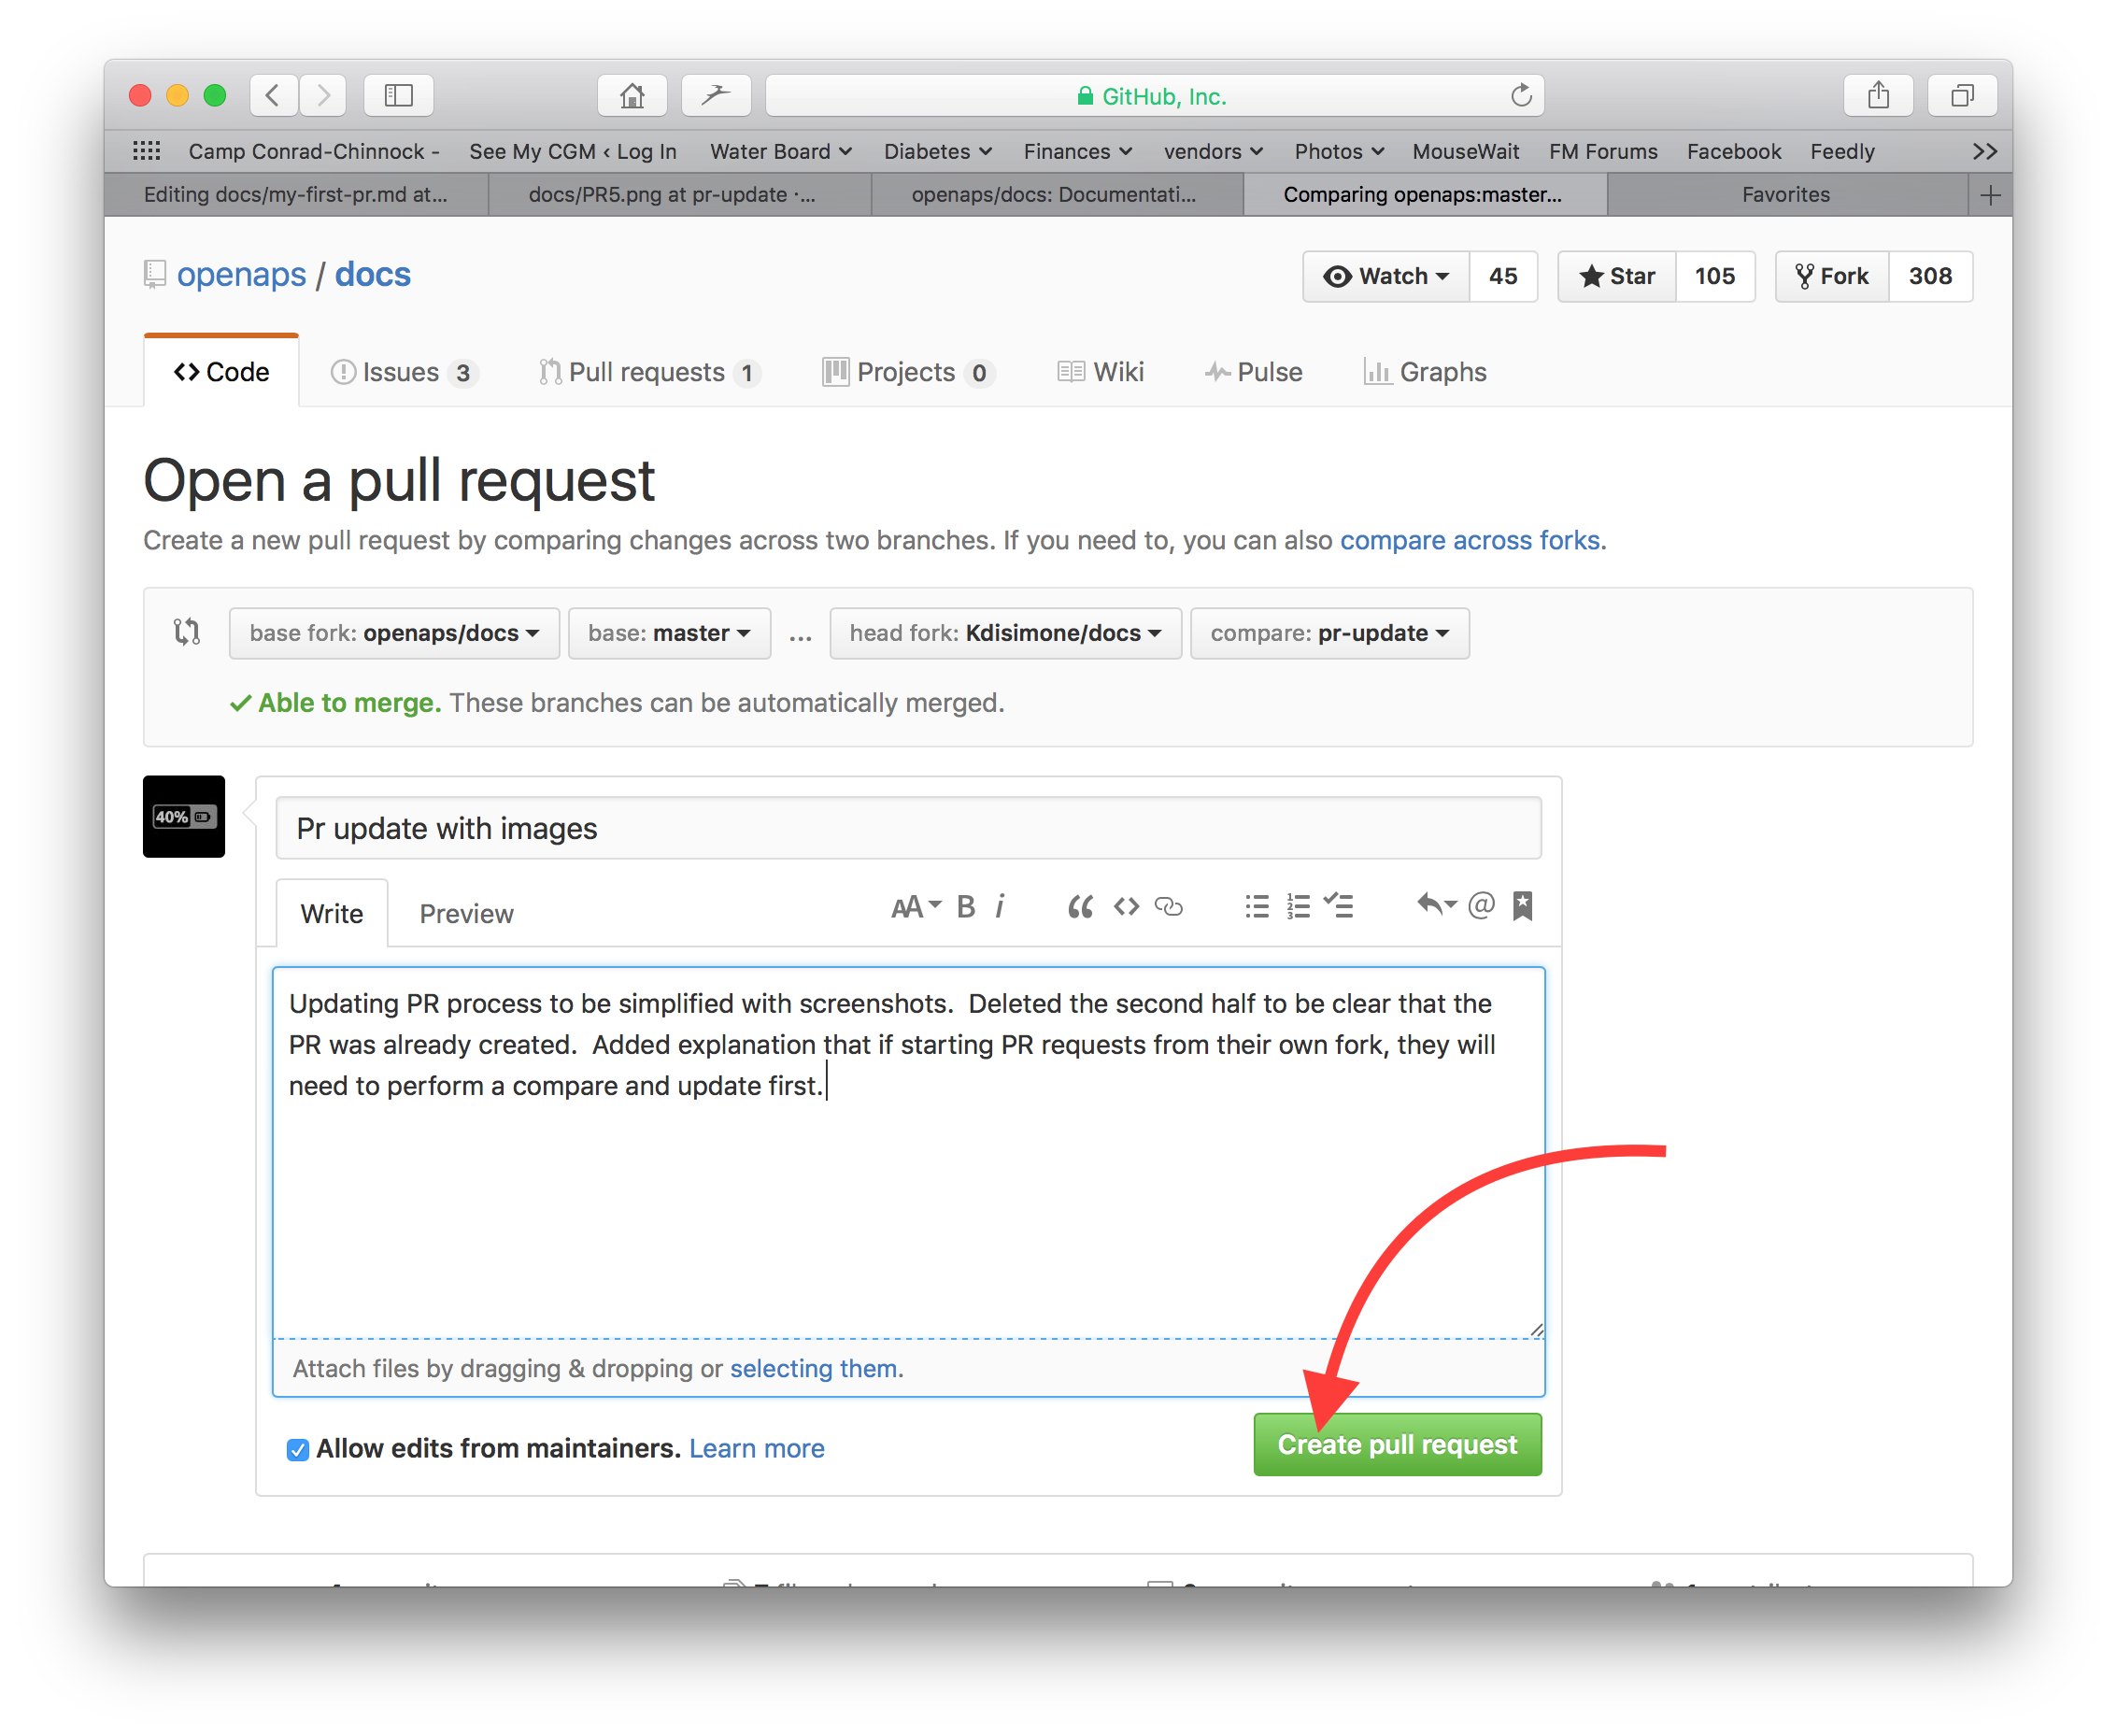
- Click the green “Propose file changes” or “Commit changes” button. In the page that appears click “Create Pull Request” and again in the next page click “Create Pull Request”.
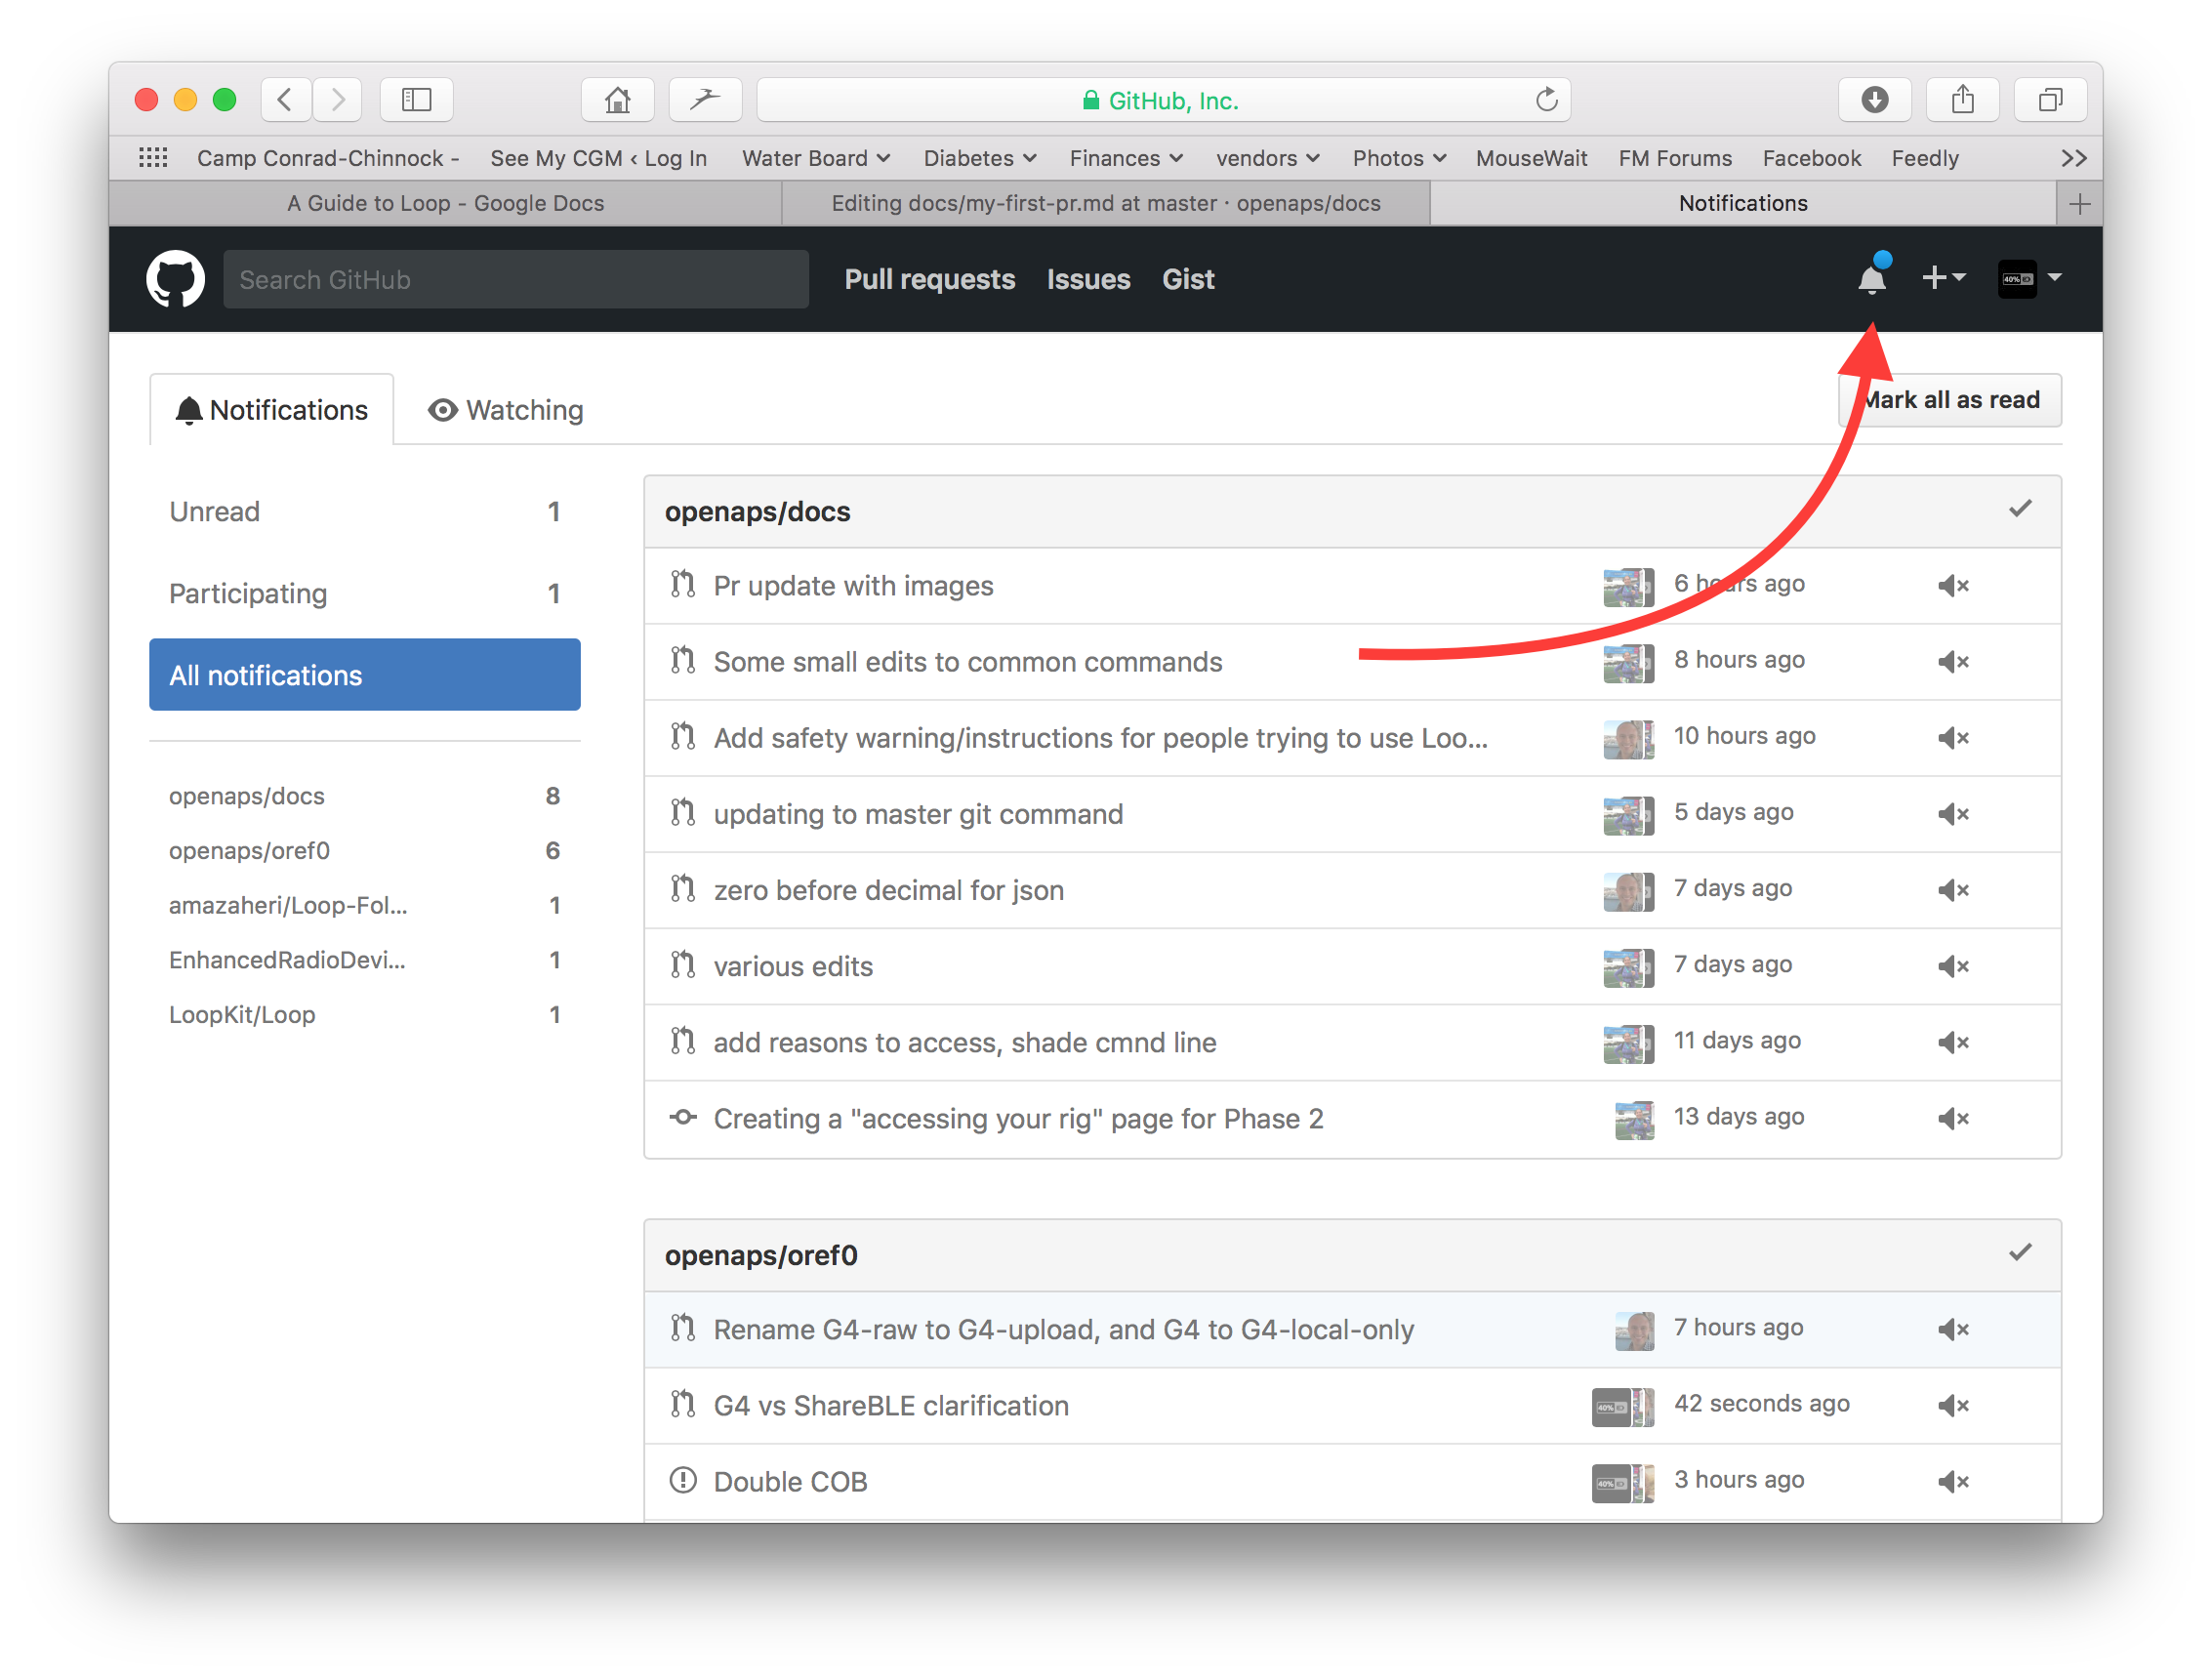
- That completes the opening of a pull request, PR. GitHub assigns the PR a number, located after the title and a hash mark. Return to this page to check for feedback (or, if you have Github notifications emailed to you, you will get emails notifying you of any activity on the PR). The edit will now be in a list of PR’s that the team will review and potentially give feedback on before committing to the main documentation for AndroidAPS! If you want to check on the progress of the PR, you can click on the bell logo in the upper right corner of your GitHub account and see all your PRs.
PS: Your fork and branch will still be sitting on your own personal GitHub account. After you get a notification that your PR has been merged, you can delete your branch if you are done with it (Step 8’s notification area will provide a link to delete the branch once it has been closed or merged). For future edits, if you follow this procedure the edits will always start with an updated version of the AndroidAPSdocs repositories. If you choose to use another method to start a PR request (e.g., editing starting from your forked repo’s master branch as the starting point), you will need to ensure your repo is up-to-date by performing a “compare” first and merging in any updates that have happened since you last updated your fork. Since people tend to forget to update their repos, we recommend using the PR process outlined above until you get familiar with performing “compares”.
Syntaxe du Code
At the moment there are two languages used for docs pages:
- Markdown (.md) - the markup language originally used for docs pages
- reStructuredText (.rst) - the new markup language
We will change all docs pages from Markdown to reStructuredText bit by bit. In the meantime it is important that you use the correct syntax when formatting text or linking. If you are not sure just have a look at format / link codes on existing pages.
Taille des images
If using images please use reasonable sizes. Screenshot images should be 250 pixels wide.
Fichiers .md
Formatage du texte
- bold:
**text** - italic:
*text* - Headline 1:
# headline - Headline 2:
## headline - Headline 3:
### headline
Images
- images:

Liens
- external link:
[alt text](www.url.tld) - internal link to .md page:
[alt text](.../folder/file.md) - internal link to .rst page:
[alt text](.../folder/file.rst) - internal link to headline:
[alt text](.../folder/file#headline)
Fichiers .rst
Formatage du texte
bold:
**text**italic:
*text*Titre 1 :
titre*****Titre 2 :
titre=====Titre 3 :
titre-----
Images
images:
.. image:: ../images/modules.png:alt: alt text
Liens
- external link:
`alt text <www.url.tld>_` - internal link to .md page:
`alt text <../folder/file.html>_` - internal link to .rst page:
`alt text <../folder/file.html>_` - internal link to headline:
`alt text <../folder/file.html#headline>_`
Liens internes
If you want to set an internal link within the AndroidAPS documentation, please only use relative links. Only this will make the link work in the other languages (Czech, German...) as well.
In files with .md ending:
[text](../Usage/Test.md)will set an internal hyperlink one directory up from where you are and then into the subdirectory /Usage. Ending of the target file must be .md or .rst (not .html)[text](./Usage/Test.md)will set an internal hyperlink from where you are into /Usage. Ending of the target file must be .md or .rst (not .html)- To set the link to an anchor (i.e. a headline) you have to omit the file extension
[text](../Usage/Test#anchor)instead of[text](../Usage/Test.md#anchor)
In files with .rst ending:
`Text <../Usage/Test.hmtl>`_will set a hyperlink one directory up from where you are and then into the subdirectory /Usage. Ending of the target file must be .html.Except you are in a toctree. Then you have to write it like this:
Text <../Usage/Test.md>with .md or .rst (not .html).Text <./Usage/Test.md>will set a hyperlink from where you are into /Usage.To set the link to an anchor (i.e. a headline) you have to add the anchor to the link
[text](../Usage/Test.html#anchor)instead of[text](../Usage/Test#anchor)
Adding multiple images to documentation
If you are planning to make a lot of edits, including adding images to help illustrate parts of the documentation (thank you!), you may want to take the following approach:
As you go and save screenshots, rename the screenshots to a descriptive name - but try not to use spaces as that confuses Github. Instead, use underscores. I.e. Example_batch_images_upload.png rather than “Example batch images upload.png”.
Please use reasonable sizes. Screenshot images should be 250 pixels wide.
You can upload images in batches easily by:
- Navigate to the images folder (https://github.com/openaps/AndroidAPSdocs/tree/master/docs/EN/images - but make sure you are in your fork/copy of the docs Images folder to be able to do this (replace “openaps” in the URL with your github username)).
- Click in the upper right corner where it says “Upload files”
- Drag and drop your images into the screen
- Commit these to your branch
- Now, you can look for the URL/relative path of each file and use that to refer to when adding images into a page in the documentation.
- To see examples of how to add the images, you can look at the “raw” code of a page to see an example from a page that already has the images embedded successfully. Make sure you use the correct code for the page type you are on (.md or .rst). The main thing is to have a plain text description, followed by a link with a relative path to the image, like this:
- For .md pages:
(That code is exactly how the image below is embedded to be displayed.) - For .rst pages:
.. image:: ../images/Example_batch_images_upload.png:alt: Example of uploading images in batches

- Après avoir ajouté des images ou effectué des modifications, vous pouvez soumettre un PR à la branche principale d’AndroidAPSdocs.