Objectifs
AndroidAPS a une série d’objectifs qui doivent être complétés pour vous guider à travers les fonctionnalités et les paramètres de la boucle sécurisée. Ils s’assurent que vous avez correctement configuré tout ce qui est détaillé dans les sections ci-dessus, et que vous comprenez ce que votre système fait et pourquoi vous pouvez lui faire confiance.
Si vous mettez à jour les téléphones alors vous pouvez exporter vos paramètres pour garder votre progression à travers les objectifs. Non seulement vos progrès à travers les objectifs de l’être sauvés, mais également vos paramètres de sécurité, tels que max bolus etc. Si vous n’exportez pas et n’importez pas vos paramètres, vous devrez recommencer les objectifs depuis le début. C’est une bonne idée de sauvegarder vos paramètres souvent juste au cas où.
Objectif 1 : Paramétrage de la visualisation et la surveillance des données, analyse des débits Basal et des ratios
- Sélectionnez la source de glycémie adaptée à votre configuration. Voir Source GLY pour plus d’informations.
- Sélectionnez la bonne pompe dans le générateur de configuration (sélectionnez la Pompe virtuelle si vous utilisez un modèle de pompe sans pilote AndroidAPS pour le bouclage) afin de vous assurer que votre pompe peut communiquer avec AndroidAPS.
- Si vous utilisez la pompe DanaR, assurez-vous d’avoir suivi les instructions Pompe à insuline DanaR pour assurer le lien entre la pompe et AndroidAPS.
- Suivez les instructions de la page Nightscout pour s’assurer que Nightscout peut recevoir et afficher ces données.
- Notez que l’URL dans NSClient doit être SANS /api/v1/ à la fin - voir les paramètres NSClient dans les Préférences.
Vous devrez peut-être attendre la prochaine lecture de glycémie avant qu’AndroidAPS ne la reconnaisse.
Objectif 2 : Apprendre comment contrôler AndroidAPS
Exécutez différentes actions dans AndroidAPS tel que décrit dans cet objectif.
Cliquez sur le texte orange “Pas encore terminé” pour accéder à la liste des tâches.
Des liens seront fournis pour vous guider si vous n’êtes pas encore familiarisé avec une action spécifique.

Objectif 3 : Prouver ses connaissances
Passez un examen à choix multiples pour tester vos connaissances d’AndroidAPS.
Click on the orange text “Not completed yet” to access the page with the question and answering options.

Links will be provided to guide you in case you are unsure about the correct answers yet.
Skip objectives
- Only if you have been closed looping with another system (i.e. OpenAPS, iOS Loop) before and can proof this (i.e. at least 3 months of looping data in Nightscout), you can send an email to objectives@androidaps.org with your NS address and request code to bypass the rest of objectives.
Objectif 4 : Démarrage de la boucle ouverte
- Sélectionnez la Boucle Ouverte soit à partir des Préférences, soit en faisant un appui long sur le bouton de boucle en haut à gauche de l’écran d’accueil.
- Travaillez dans les Préférences pour la configurer pour vous.
- Adoptez manuellement au moins 20 suggestions de débits de base temporaires sur une période de 7 jours; saisissez-les sur votre pompe et confirmez dans AndroidAPS que vous les avez acceptés. Assurez-vous que ces données apparaissent bien dans AndroidAPS et dans Nightscout.
- Activez des Cibles temporaires, si nécessaire. Utilisez des cibles temp. hypo temp pour éviter que le système ne corrige trop fortement une augmentation de la glycémie après une hypo.
Reduce number of notifications
To reduce the Number of decisions to be made while in Open Loop set wide target range like 90 - 150 mg/dl or 5,0 - 8,5 mmol/l. * You might even want to wider upper limit (or disable Open Loop) at night.
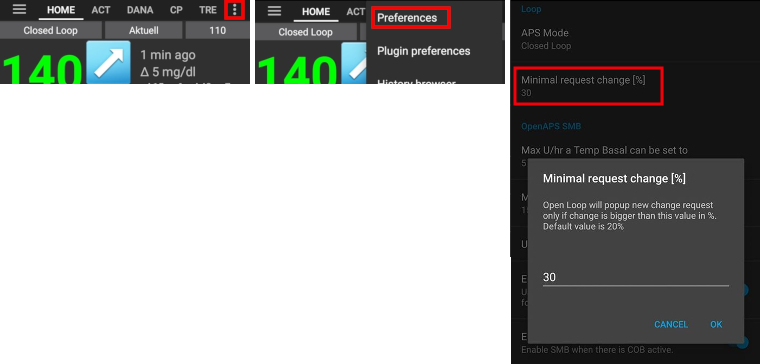
In Preferences you can set a minimum percentage for suggestion of basal rate change.
Also, you do not need to act every 5 minutes on all suggestions...
Objectif 5 : Compréhension de la Boucle Ouverte, y compris les propositions de débits Basal temporaires
- Start to understand the thinking behind the temp basal recommendations by looking at the determine basal logic and both the forecast line in AndroidAPS homescreen/Nightscout and the summary of outputs from the calculations in your OpenAPS tab.
You will want to set your target higher than usual until you are confident in the calculations and settings. System allows
- a low target to be a minimum of 4 mmol (72 mg/dl) or maximum of 10 mmol (180 mg/dl)
- a high target to be a minimum of 5 mmol (90 mg/dl) and maximum of 15 mmol (225 mg/dl)
- a temporary target as a single value can be anywhere in the range of 4 mmol to 15 mmol (72 mg/dl to 225 mg/dl)
The target is the value that calculations are based on, and not the same as where you aim to keep your blood glucose values within. If your target is very wide (say, 3 or more mmol [50 mg/dl or more] wide), you will often find little AAPS action. This is because blood glucose is eventually predicted to be somewhere in that wide range and therefore not many fluctuating temporary basal rates are suggested.
You may want to experiment with adjusting your targets to be a closer together range (say, 1 or less mmol [20 mg/dl or less] wide), and observe how the behavior of your system changes as a result.
You can view a wider range (green lines) on the graph for the values you aim to keep your blood glucose within by entering different values in Preferences > Range for Visualisation.

Stop here if you are open looping with a virtual pump - do not click Verify at the end of this objective.

Objectif 6 : Démarrage de la boucle fermée avec le système AGB ( Arrêt pour Glycémie Basse )

Closed loop will not correct high bg values in objective 6 as it is limited to low glucose suspend. High bg values have to be corrected manually by you!
- Select Closed Loop either from Preferences or by pressing and holding the Open Loop button in the top left of the home screen.
- Set your target range slightly higher than you usually aim for, just to be safe.
- Watch how temporary basals are active by viewing the blue basal text on the homescreen or the blue basal render on the homescreen graph.
- Ensure your settings have supported AndroidAPS to avoid having to treat a low glucose over a period of 5 days. If you are still having frequent or severe low glucose episodes then consider refining your DIA, basal, ISF and carb ratios.
- You don’t have to change your settings. During objective 6 maxIOB setting is internally set to zero automatically. This override will be reversed when moving to objective 7.
The system will override your maxIOB settings to zero, which means if blood glucose is dropping it can reduce basal for you, but if blood glucose is rising then it will only increase basal if the IOB is negative (from a previous Low Glucose Suspend), otherwise basal rates will remain the same as your selected profile. Vous pouvez subir temporairement des pics de glycémie à la suite d’hypos sans pouvoir augmenter le débit de base sur le rebond.
Objectif 7 : Réglage de la Boucle Fermée, augmentation de l’IA (Insuline Active) maximale au dessus de 0 et abaissement progressif des cibles glycémiques
Raise your ‘Maximum total IOB OpenAPS can’t go over’ (in OpenAPS called ‘max-iob’) above 0 over a period of 1 day, the default recommendation is “average mealbolus + 3x max daily basal”(for SMB algorithm) or “3x max daily basal” (for older AMA algorithm) but you should slowly work up to this until you know your settings work for you (max daily basal = the maximum hourly value in any time segment of the day).
This recommendation should be seen as a starting point. If you set to the 3x and you are seeing moves that push you to hard and fast then lower that number. If you are very resistant raise it a very little at a time.

Once confident on how much IOB suits your looping patterns then reduce your targets to your desired level.
Objectif 8 : Ajustement des débits Basal et des ratios si nécessaire, puis activation de la fonction auto-sens
- You can use autotune as a one off to check your basals remain accurate, or do a traditional basal test.
- Enable autosens over a period of 7 days and watch the white line on the homescreen graph show how your sensitivity to insulin may be rising or falling as a result of exercise or hormones etc, and keep an eye in the OpenAPS report tab how AndroidAPS is adjusting the basals and/or targets accordingly.
Don’t forget to record your looping in `this form <http://bit.ly/nowlooping>`_ logging AndroidAPS as your type of DIY loop software, if you have not already done so.
Objectif 9 : Activation de fonctionnalités supplémentaires en journée, comme l’Aide au Repas Améliorée ARA (AMA)
- Now you should feel confident with how AndroidAPS works and what settings reflect your diabetes best
- Then over a period of 28 days you can try additional features that automate even more of the work for you such as the advanced meal assist
Objectif 10 : Activation de fonctionnalités supplémentaires pour l’utilisation en journée, telles que la fonction SMB
- You must read the SMB chapter in this wiki and chapter oref1 in openAPSdocs to understand how SMB works, especially what’s the idea behind zero-temping.
- Then you ought to rise maxIOB to get SMBs working fine. maxIOB now includes all IOB, not just added basal. That is, if given a bolus of 8 U for a meal and maxIOB is 7 U, no SMBs will be delivered until IOB drops below 7 U. A good start is maxIOB = average mealbolus + 3x max daily basal (max daily basal = the maximum hourly value in any time segment of the day - see objective 7 for an illustration)
- min_5m_carbimpact default in absorption settings has changed from 3 to 8 going from AMA to SMB. If you are upgrading from AMA to SMB, you have to change it manualy