Paramètres xDrip+
If not already set up then download xDrip+.
This documentation is for xDrip+ for Android only. There is an app “xDrip for iOS” that has nothing to do with the original xDrip+ for Android.
Pour les émetteurs G6 fabriqués après l’automne/fin 2018 (c.a.d. N° de série commençant par 80 ou 81) veuillez vous assurer d’utiliser au minimum la version release du 2019/05/18.
Si le numéro de série de votre émetteur Dexcom G6 is starting with 8G... or 8H... use one of the latest nightly builds.
If your phone runs Android 10 and you have difficulties with xDrip+ master try nightly build 2019/12/31 or later.
Paramètres de base pour tous les systèmes MGC & MGF
Assurez-vous de définir correctement l’URL de base incluant S à la fin de https:// (et non http://)
par ex. https://API_SECRET@your-app-name.herokuapp.com/api/v1/
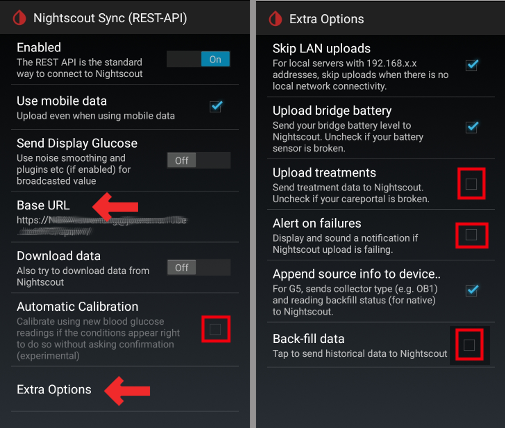
-> Menu Hamburger (en haut à gauche de l’écran d’accueil) -> Paramètres-> Cloud Upload -> Syncchronisation Nightscout (REST-API) -> URL de base
Désactivez
Automatic CalibrationSi la caseAutomatic Calibrationest cochée, ActivezDownload dataune fois, ensuite décochez la case pourAutomatic Calibrationet désactivezDownload dataà nouveau, sinon les traitements (insuline & glucides) seront ajoutés deux fois dans Nightscout.Appuyez sur
Extra OptionsDésactivez
Upload treatmentsetBack-fill data.Safety warning : You must deactivate “Upload treatments” from xDrip+, otherwise treatments can be doubled in AAPS leading to false COB and IOB.
L’option
Alert on failuresdoit également être désactivée. Sinon, vous aurez une alarme toutes les 5 minutes dans le cas ou le wifi / réseau mobile est trop mauvais, ou si le serveur n’est pas disponible.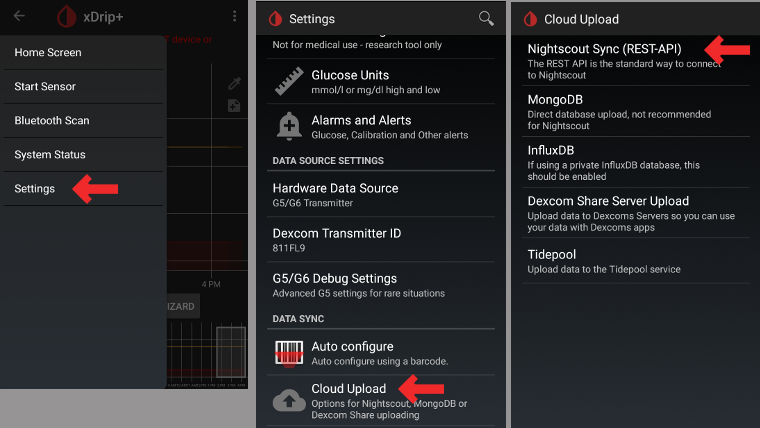
** Inter App-Settings ** (Diffusion locale) Si vous voulez utiliser AndroidAPS et que les données doivent être transmises à AndroidAPS, vous devez activer la Diffusion locale dans xDrip + dans les paramètres Inter-app.
Pour que les valeurs soient les mêmes, vous devez activer
Send Display Glucose.Si vous avez aussi activé
Accept Treatmentset la diffusion dans AndroidAPS, alors xDrip+ recevra l’insuline, les glucides et les informations sur les débits de basal d’AndroidAPS et peut estimer la prédiction des hypo, etc. avec plus de précision.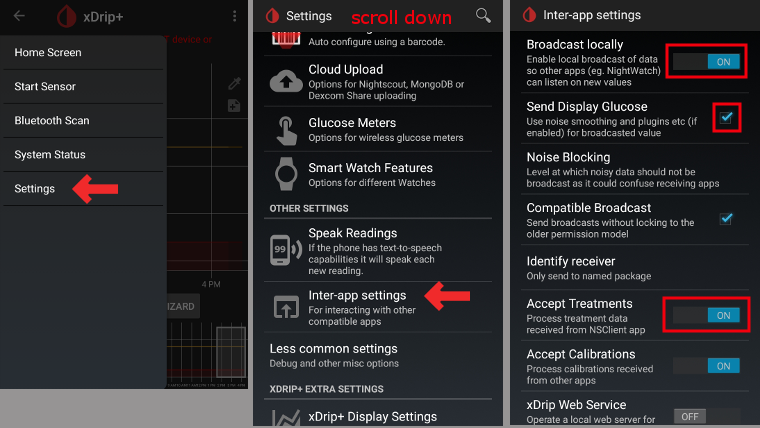
Identifier le récepteur
Si vous avez des problèmes de diffusion locale (AAPS ne recevant pas les valeurs Gly de xDrip +) allez dans Paramètres > Inter-app settings > Identify receiver et entrez
info.nightscout.androidaps.Attention: La correction automatique a parfois tendance à changer la lettre i en majuscules. Vous ne devez utiliser que des minuscules pour taper
info.nightscout.androidaps. Capital I would prevent AAPS from receiving BG values from xDrip+.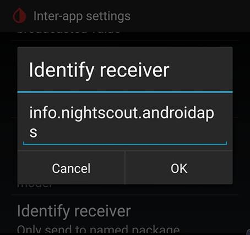
xDrip+ & Dexcom G6
- L’émetteur Dexcom G6 peut être connecté simultanément au récepteur Dexcom (ou alternativement à la pompe t:slim) et à une application sur votre téléphone.
- Lorsque vous utilisez xDrip+ comme récepteur, désinstallez d’abord l’application Dexcom. Vous ne pouvez pas connecter xDrip + et l’application Dexcom avec l’émetteur en même temps !
- Si vous avez besoin d’éclaircissements et voulez profiter des alarmes xDrip+, utilisez l’applications Dexcom patchée avec la diffusion locale vers xDrip+.
Version de XDrip+ en fonction du numéro de série de l’émetteur G6.
- Pour les émetteurs G6 fabriqués après l’automne/fin 2018 (c.a.d. N° de série commençant par 80 ou 81) veuillez vous assurer d’utiliser au minimum la version release du 2019/05/18.
- Si le numéro de série de votre émetteur Dexcom G6 commence par 8G ou 8H essayez Nightly build 2019/07/28 ou ultérieure.
Paramètres spécifiques à Dexcom
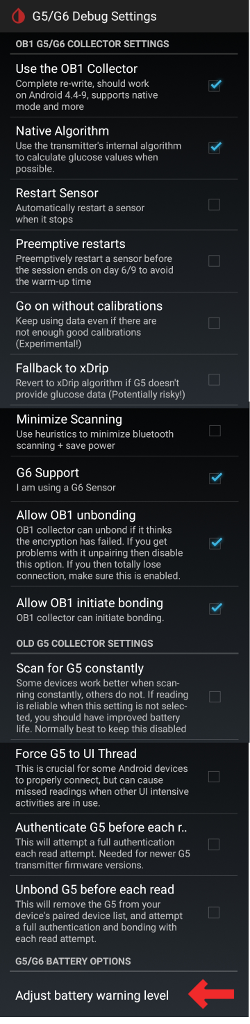
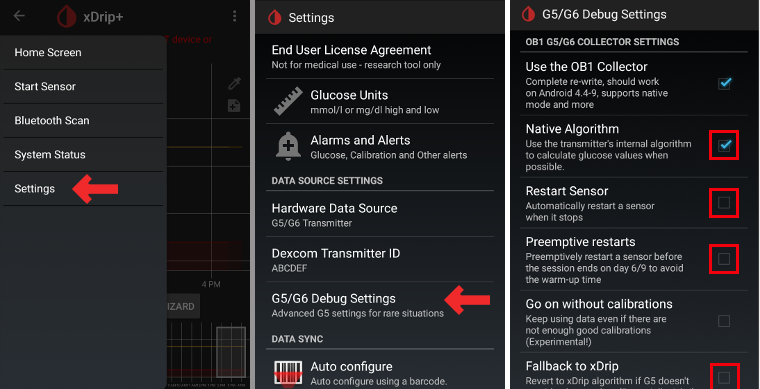
Ouvez les paramètres de débogage G5/G6 -> Menu Hamburger (en haut à gauche de l’écran d’accueil) -> Paramètres -> G5/G6 Debug Settings
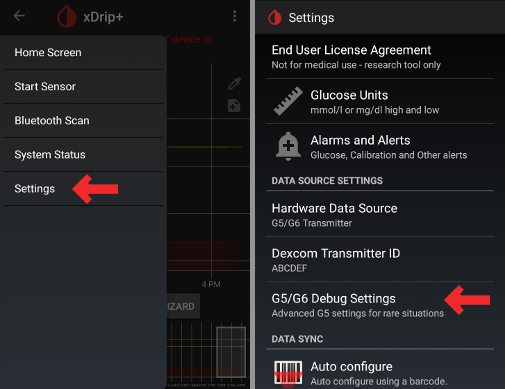
Activez les paramètres suivants
Use the OB1 CollectorNative Algorithm(important if you want to use SMB)G6 supportAllow OB1 unbondingAllow OB1 initiate bonding
Toutes les autres options doivent être désactivées
Ajuster le niveau d’alerte batterie à 280 (en bas des paramètres de débogage G5/G6)
Redémarrages préventifs non recommandés
With Dexcom transmitters whos serial no. is starting with 8G or 8H preemptive restarts do not work and might kill the sensor completely!
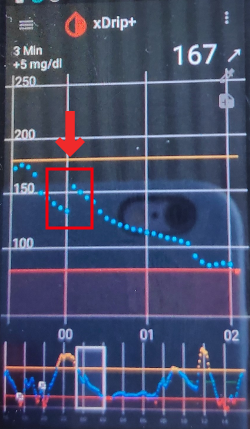
The automatic extension of Dexcom sensors (preemptive restarts) is not recommended as this might lead to “jumps” in BG values on day 9 after restart.
Ce qui est clair, c’est que l’utilisation du G6 est peut-être un peu plus complexe qu’on pourrait le penser au premier abord. Pour l’utiliser en toute sécurité, il y a quelques points à prendre en compte :
- If you are using the native data with the calibration code in xDrip+ or Spike, the safest thing to do is not allow preemptive restarts of the sensor.
- If you must use preemptive restarts, then make sure you insert at a time of day where you can observe the change and calibrate if necessary.
- If you are restarting sensors, either do it without the factory calibration for safest results on days 11 and 12, or ensure you are ready to calibrate and keep an eye on variation.
- Pre-soaking of the G6 with factory calibration is likely to give variation in results. If you do pre-soak, then to get best results, you will probably need to calibrate the sensor.
- If you aren’t being observant about the changes that may be taking place, it may be better to revert to non-factory-calibrated mode and use the system like a G5.
To learn more about the details and reasons for these recommendations read the complete article published by Tim Street at www.diabettech.com.
Connecter l’émetteur G6 pour la première fois
For second and following transmitters see Extend transmitter life below.
Pour les émetteurs G6 fabriqués après l’automne/fin 2018 (c.a.d. N° de série commençant par 80 ou 81) veuillez vous assurer d’utiliser au minimum la version release du 2019/05/18.
Si le numéro de série de votre émetteur Dexcom G6 commence par 8G ou 8H essayez Nightly build 2019/07/28 ou ultérieure.
Turn original Dexcom receiver off (if used).
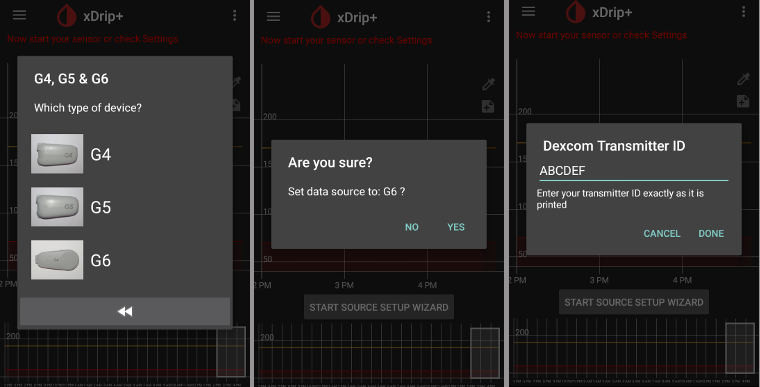
Long press the red xDrip+ blood drop icon on the main screen to enable the
Source Wizard Button.Use the Source Wizard Button which ensures default settings including OB1 & Native Mode
- This guides you through the initial set up.
- you will need your transmitter serial number if this is the first time you’ve used it.
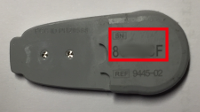
Put in serial number of new transmitter (on the transmitter packaging or on the back of the transmitter). Be careful not to confuse 0 (zero) and O (capital letter o).
Insert new sensor (only if replacing)
Put transmitter into sensor
Do not start new sensor before the following information is shown in Classic Status Page -> G5/G6 status -> PhoneServiceState:
- Transmitter serial starting with 80 or 81: “Got data hh:mm” (i.e. “Got data 19:04”)
- Transmitter serial starting with 8G or 8H: “Got glucose hh:mm” (i.e. “Got glucose 19:04”) or “Got no raw hh:mm” (i.e. “Got now raw 19:04”)

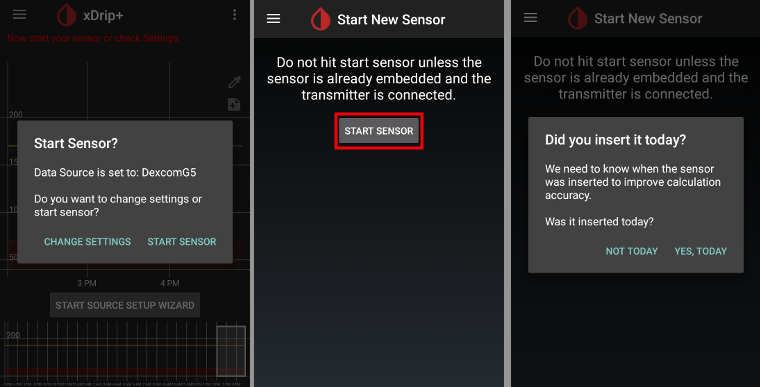
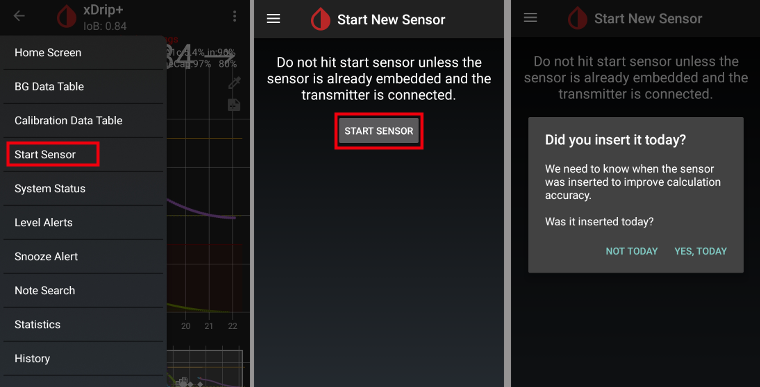
Start sensor (only if replacing)
-> Near the bottom of the screen
Warm Up x,x hours leftmust be displayed after a few minutes.
-> If your transmitter serial no. does not start with 8G or 8H and there is no time specification after a few minutes stop and restart the sensor.
Restart collector (system status - if not replacing sensor}
Do not turn original Dexcom receiver (if used) back on before xDrip+ shows first readings.
Faites un appui long sur l’icône rouge xDrip+ sur l’écran principal pour désactiver
Source Wizard Button.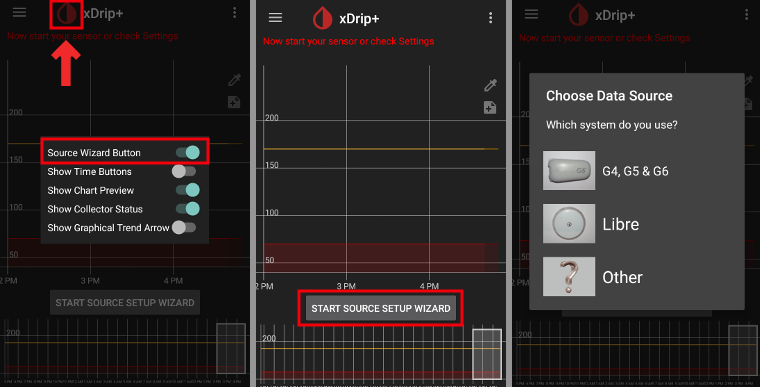
Etat de la batterie de l’émetteur
- Battery status can be controlled in system status (Hamburger menu top left on homescreen)
- Swipe left once to see second screen.
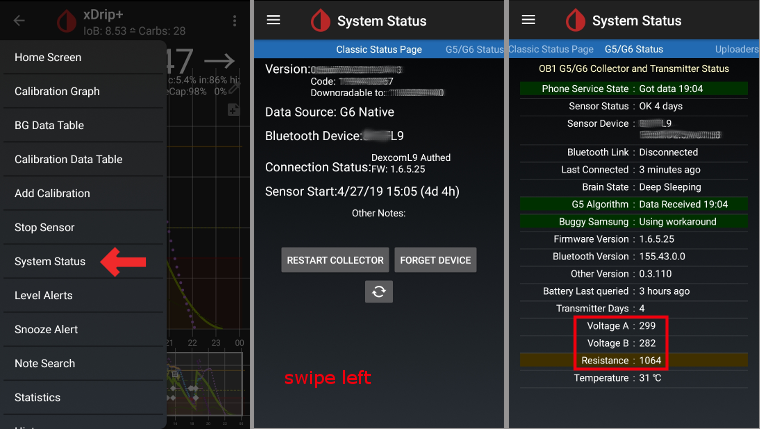
- The exact values when the transmitter “dies” due to empty battery are not known. The following information was posted online after the transmitter “died”:
- Posting 1: Transmitter days: 151 / Voltage A: 297 / Voltage B: 260 / Resistance: 2391
- Posting 2: Transmitter days: 249 / Voltage A: 275 (at time of failure)
Extend transmitter life
So far life cannot be extended for transmitters whos serial no. starts with 8G or 8H.
To prevent difficulties starting sensors it is highly recommended to extend transmitter life before day 100 of first usage.
Running sensor session will be stopped when extending transmitter life. So, extend before sensor change or be aware that there will be a new 2 h warm-up phase.
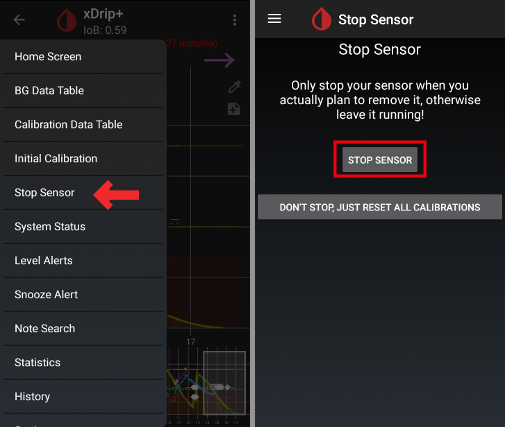
Stop sensor manually via hamburger menu.
Switch to the
engineering mode:- tap on the character on the right of the xDrip+ start screen that represents a syringe
- then tap on the microphone icon in the lower right corner
- In the text box that opens type “enable engineering mode”
- click “Done”
- If Google Speak engine is enabled, you can also speak the voice command: “enable engineering mode”.
Go to the G5 debug settings and make sure
Use the OB1 collectoris enabled.Use the voice command: “hard reset transmitter”
The voice command will be executed with the next data receipt of the transmitter
Look at the system status (Hamburger menu -> system status) and see what happens
If you see a message “Phone Service State: Hard Reset maybe failed” on second system status screen just start the sensor and this message should go away.

Transmitter days will be set to 0 after successful extension and start of sensor.
Replace transmitter
Pour les émetteurs G6 fabriqués après l’automne/fin 2018 (c.a.d. N° de série commençant par 80 ou 81) veuillez vous assurer d’utiliser au minimum la version release du 2019/05/18.
Si le numéro de série de votre émetteur Dexcom G6 is starting with 8G or 8H use one of the latest nightly builds.
Turn original Dexcom receiver off (if used).
Stop sensor (only if replacing sensor)
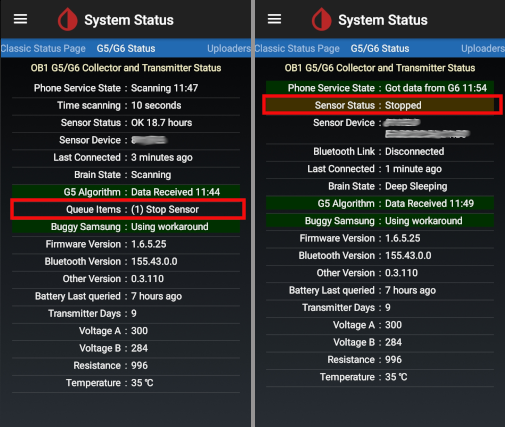
Ensure it really is stopped:
On the second “G5/G6 Status” screen look at
Queue Itemsabout halfway down - It may say something like(1) Stop SensorWait until this goes - usually within a few minutes. Sensor Status must be “Stopped” (see screenshot).
-> To remove transmitter without stopping sensor see this video https://youtu.be/AAhBVsc6NZo.
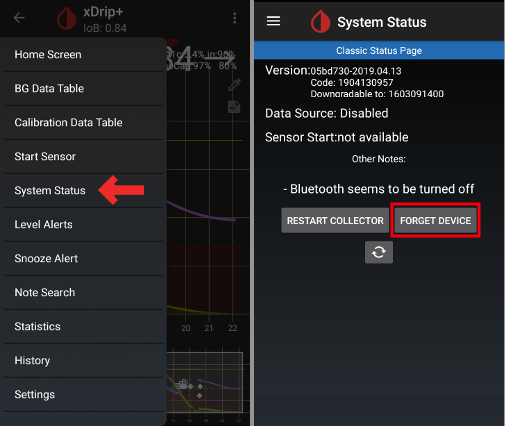
Forget device in xDrip+ system status AND in smartphone’s BT settings (Will be shown as Dexcom?? whereas ?? are the last two digits of the transmitter serial no.)
Remove transmitter (and sensor if replacing sensor)
Put the old transmitter far away to prevent reconnection. A microwave is a perfect Faraday shield for this - but unplug power cord to be 100% no one is turning the microwave on.
Long press the red xDrip+ blood drop icon on the main screen to enable the
Source Wizard Button.Use the Source Wizard Button which ensures default settings including OB1 & Native Mode
- This guides you through the initial set up.
- You will need your transmitter serial number if this is the first time you’ve used it.
Put in serial number of new transmitter. Be careful not to confuse 0 (zero) and O (capital letter o).
Insert new sensor (only if replacing).
Put transmitter into sensor - Do not start sensor immediately!
New “Firefly Transmitters” (serial no. starting with 8G or 8H) can only be used in native mode.
The following options must not be activated for new “Firefly Transmitters” (serial no. starting with 8G or 8H):
- Preemptive Restart (disable!)
- Restart sensor (disable!)
- Fallback to xDrip+ (disable!)
Check in Classic Status Page -> G5/G6 status -> PhoneServiceState if one of the following informations is displayed:
- Transmitter serial starting with 80 or 81: “Got data hh:mm” (i.e. “Got data 19:04”)
- Transmitter serial starting with 8G or 8H: “Got glucose hh:mm” (i.e. “Got glucose 19:04”) or “Got no raw hh:mm” (i.e. “Got now raw 19:04”)
Wait 15 minutes as the transmitter should communicate several times with xDrip before new sensor is started. Battery data will be shown below Firmware information.

Start sensor and DO NOT BACKDATE! Always select “Yes, today”!
Restart collector (system status - if not replacing sensor)
Do not turn original Dexcom receiver (if used) back on before xDrip+ shows first readings.
Faites un appui long sur l’icône rouge xDrip+ sur l’écran principal pour désactiver
Source Wizard Button.
New Sensor
Turn original Dexcom receiver off (if used).
Stop sensor if necessary
Ensure it really is stopped:
On the second “G5/G6 Status” screen look at
Queue Itemsabout halfway down - It may say something like(1) Stop SensorWait until this goes - usually within a few minutes.
Clean contacts (transmitter backside) with alcohol and let air-dry.
In case you use this function disable
Restart SensorandPreemptive restarts(Hamburger menu -> Settings -> G5/G6 Debug Settings). If you miss this step and have these functions enabled the new sensor will not start properly.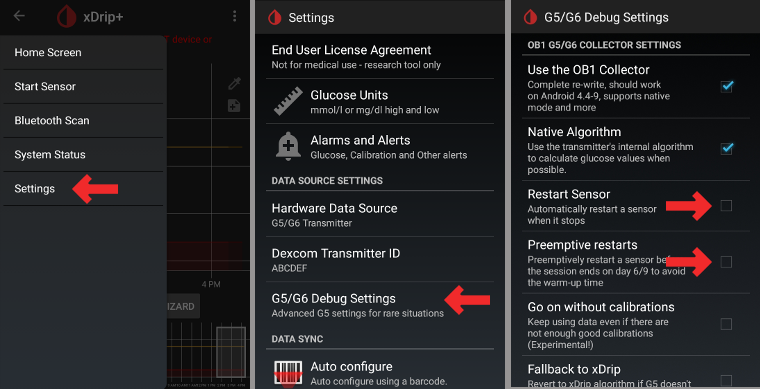
Start Sensor
For new Firefly transmitters (serial no. starting with 8G or 8H) it is mandatory, for all other transmitters it is recommended to wait approx. 15 minutes between stopping and starting the new sensor (until
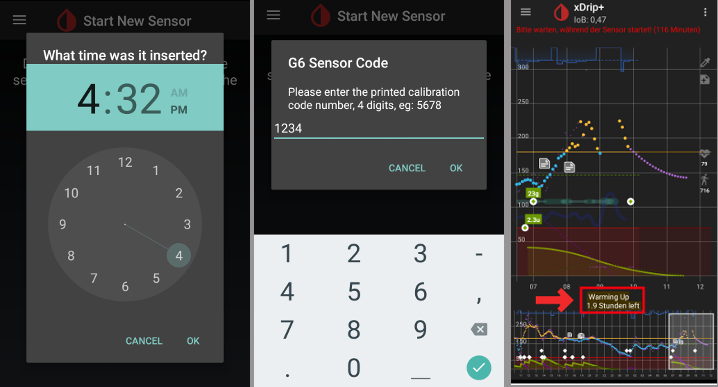
Sensor Status: Stoppedis shown on second system status screen). DO NOT BACKDATE!Set time inserted
- To use G6 Native mode you must wait for the 2 hour warm up (i.e insertion time is now).
- If you are using the xDrip+ algorithm then you can set a time more than 2 hours ago to avoid warm up. Readings may be very erratic. Therefore, this is not recommended.
Enter Sensor code (on the peel-off foil of the sensor)
- Keep code for further reference (i.e. new start after transmitter had to be removed)
- Code can also be found in xDrip+ logs: Click 3-dots-menu on xDrip+ homescreen and choose
View Event Logs.
No calibration is needed if you use G6 in “native mode”. xDrip+ will show readings automatically after 2 hour warm-up.
Do not turn original Dexcom Receiver (if used) back on before xDrip+ shows first readings.

Retrieve sensor code
In master dated 2019/05/18 and the latest nightly builds the sensor code is shown in system status (Hamburger menu top left on homescreen).
Swipe left once to see second screen.

Dexcom sensor code can also be found in xDrip+ logs.
Tap 3 dot menu (top right side on homescreen)
Select
View Event Logsand search for “code”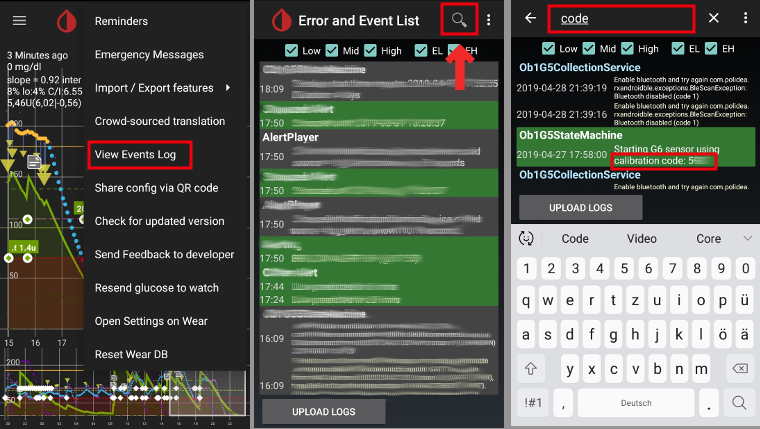
Troubleshooting Dexcom G5/G6 and xDrip+
Problem connecting transmitter
- Transmitter must be shown in your smartphone’s bluetooth settings.
- Transmitter will be shown as Dexcom?? whereas ?? represent the last two digits of your transmitter serial no. (i.e. DexcomHY).
- Open system status in xDrip+ (hamburger menu on top left side of home screen).
- Check if your transmitter is shown on first status page (‘classic status page’).
- If not: Delete device from your smartphone’s bluetooth settings and restart collector.
- Wait about 5 min. until Dexcom transmitter reconnects automatically.
Problem when starting new sensor
Please note that the following method might likely not work if your Dexcom G6 transmitter’s serial no. is starting with 8G or 8H.
- Native sensor is marked as “FAILED: Sensor Failed Start”
- Arrêter le capteur
- Redémarrez votre téléphone
- Start sensor with code 0000 (four times zero)
- Wait 15 minutes
- Arrêter le capteur
- Start sensor with “real” code (printed on the adhesive protector)
Check in xDrip+ logs if xDrip+ starts counting “Duration: 1 minute” (and so on). Only in the xDrip+ logs you can detect at an early stage whether xdrip+ has stopped a sensor. Latest status is not always shown correctly on bottom of startscreen.
xDrip+ & Freestyle Libre
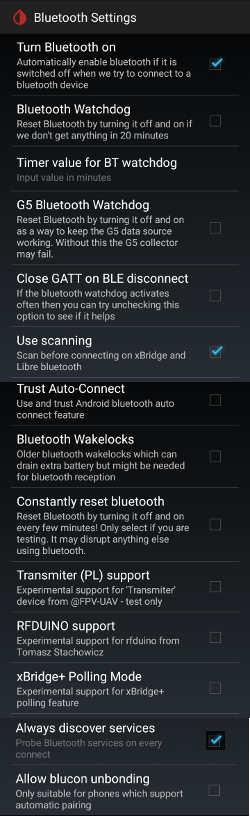
Paramètres spécifiques au Freestyle Libre
Ouvrir les paramètres Bluetooth -> Menu Hamburger (en haut à gauche de l’homescreen) -> Paramètres -> défilement vers le bas -> Paramètres moins courants -> Bluetooth Settings

Activez les paramètres suivants
Turn Bluetooth onUse scanningAlways discover services
Toutes les autres options doivent être désactivées